Buy AOSU SolarCam D1 Max on Amazon
Buy AOSU SolarCam D1 Max at AOSU
Please note that some of the links in my video descriptions are affiliate links where I earn from qualifying purchases. As an Amazon Associate I earn from qualifying purchases.
Intro
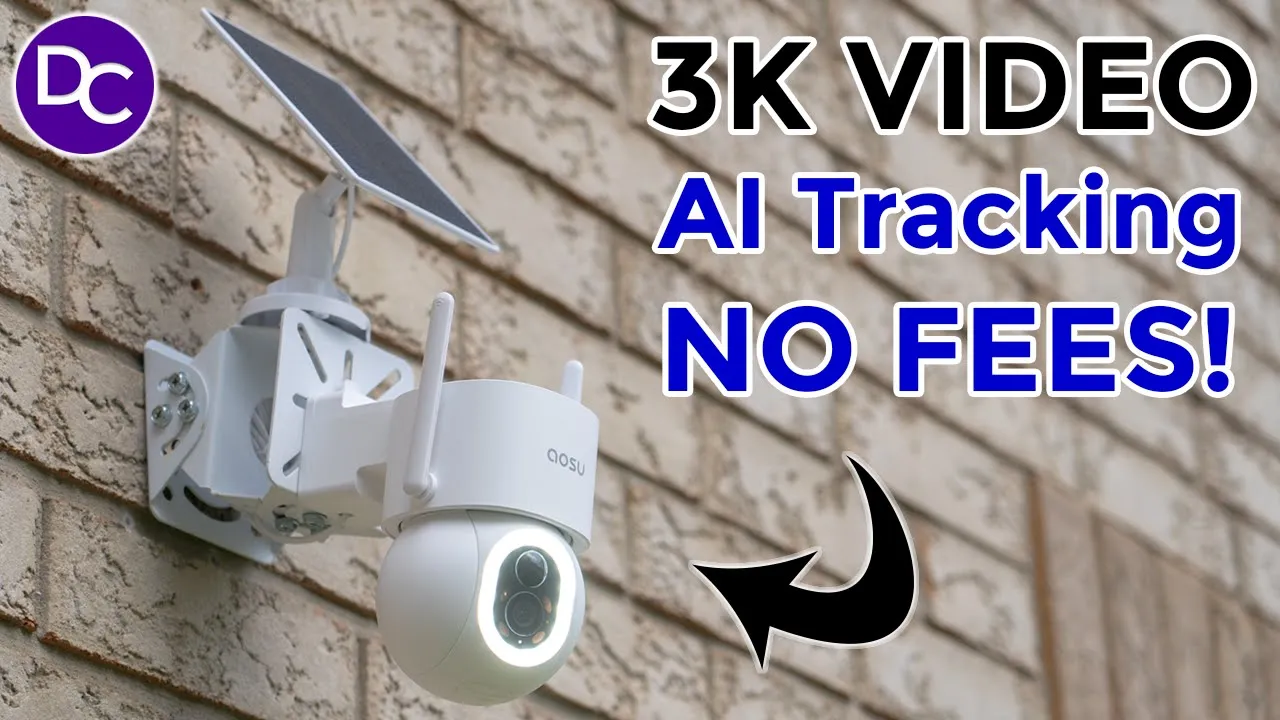
hey it’s Adrian and today I’m taking a look at asu’s brand new solar cam D1 Max now if it looks a little bit familiar is because I did review their U solar cam D1 SE which is a wired security camera so this is basically the solar power version of that the D1 Max has a ton of features such as 3K video we also have automatic pen and tilt giving you a full 360° fueld of view and thanks to the AI functionality on here it will just automatically detect certain subjects like humans vehicles and automatically track them there’s also a very impressive and bright 400 Lumen Spotlight and ip65 rating to a talk with a very loud speaker and of course zero monthly fees so if you’ve been looking for a solar powered security camera this may just be it so let’s take a closer look to see how well it performs and a big thanks to ASU for sending up for
Package
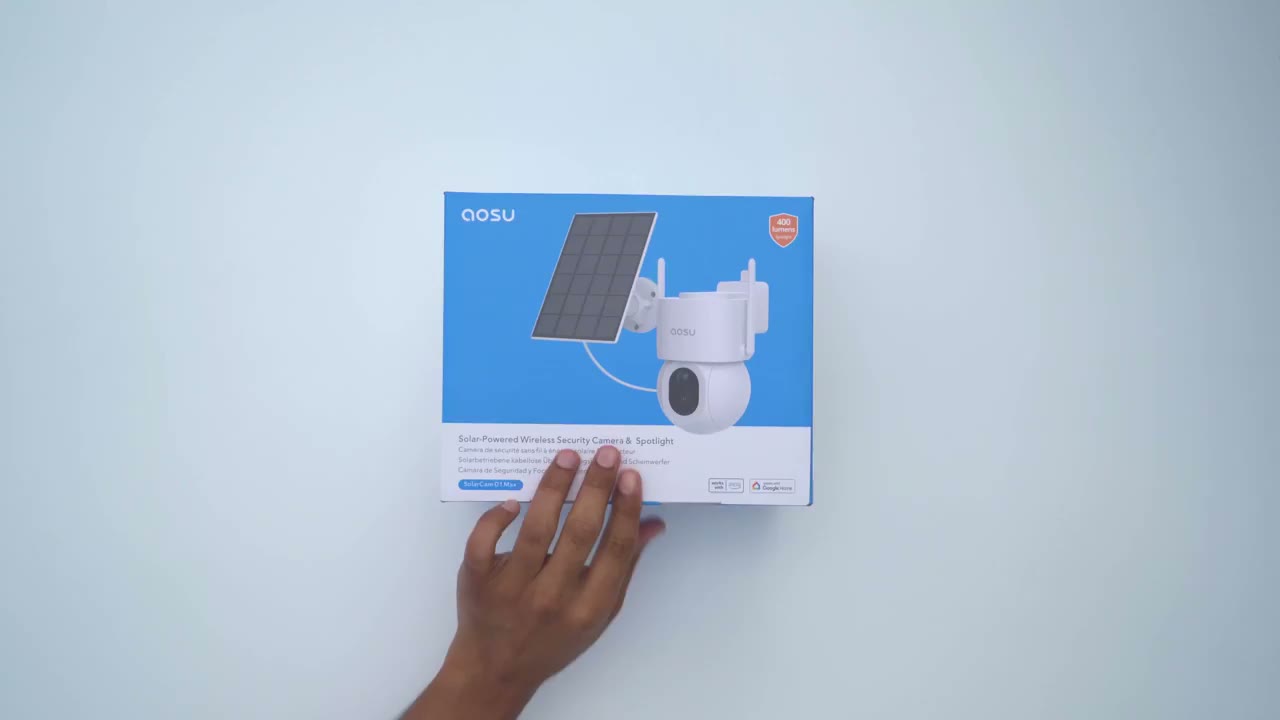
review we have the camera mounting hardware and screws the solar panel with a 3 m long or 10 ft long cable for easy installation charging cable and secure PR sticker on the front we have the 3K
Design
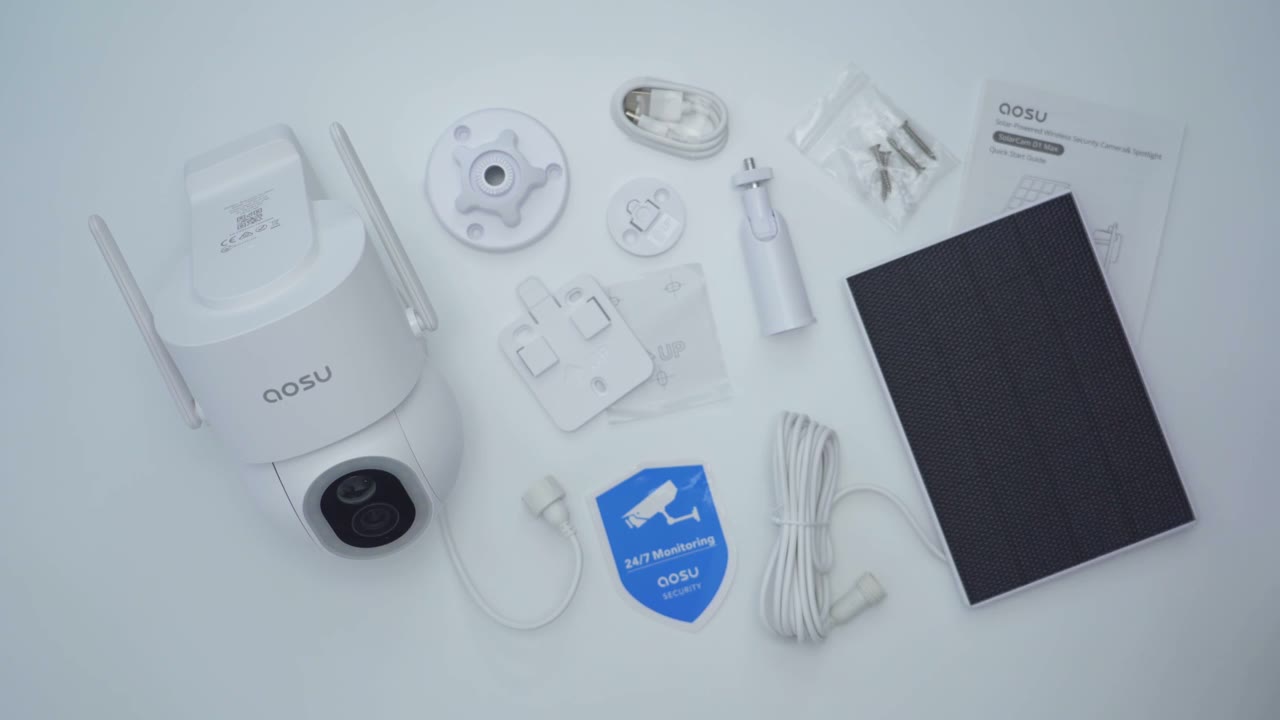
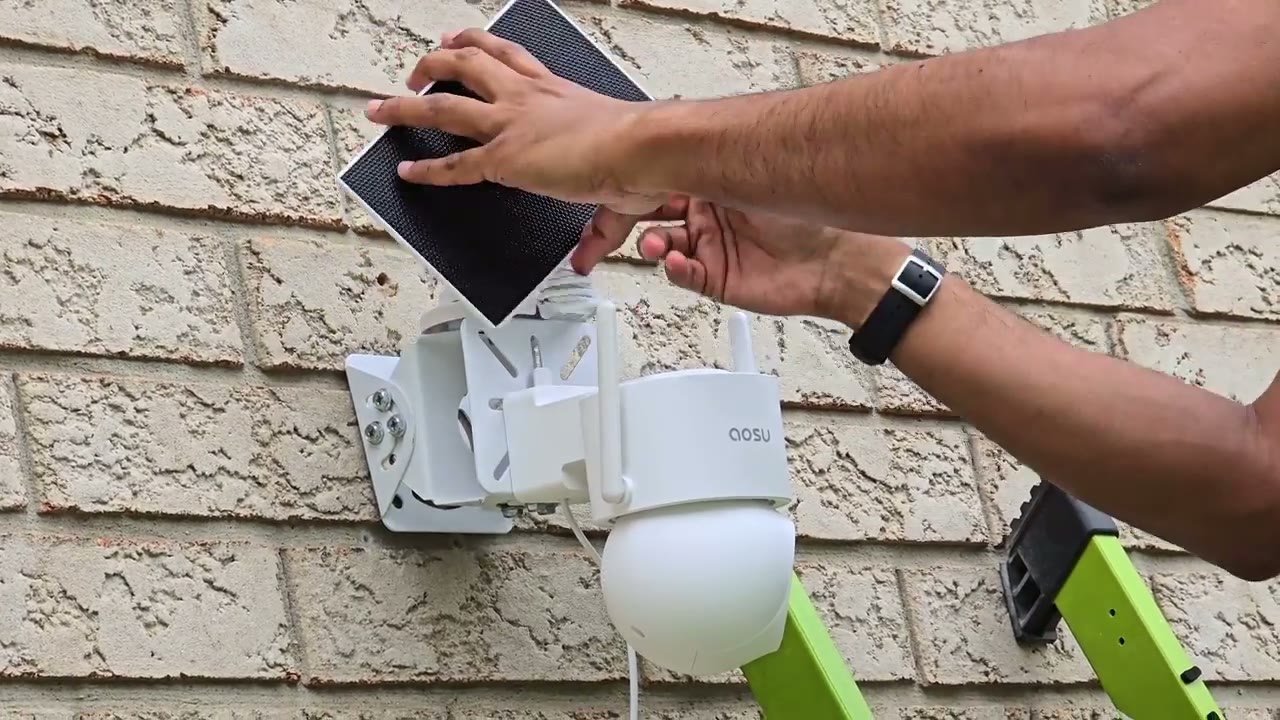
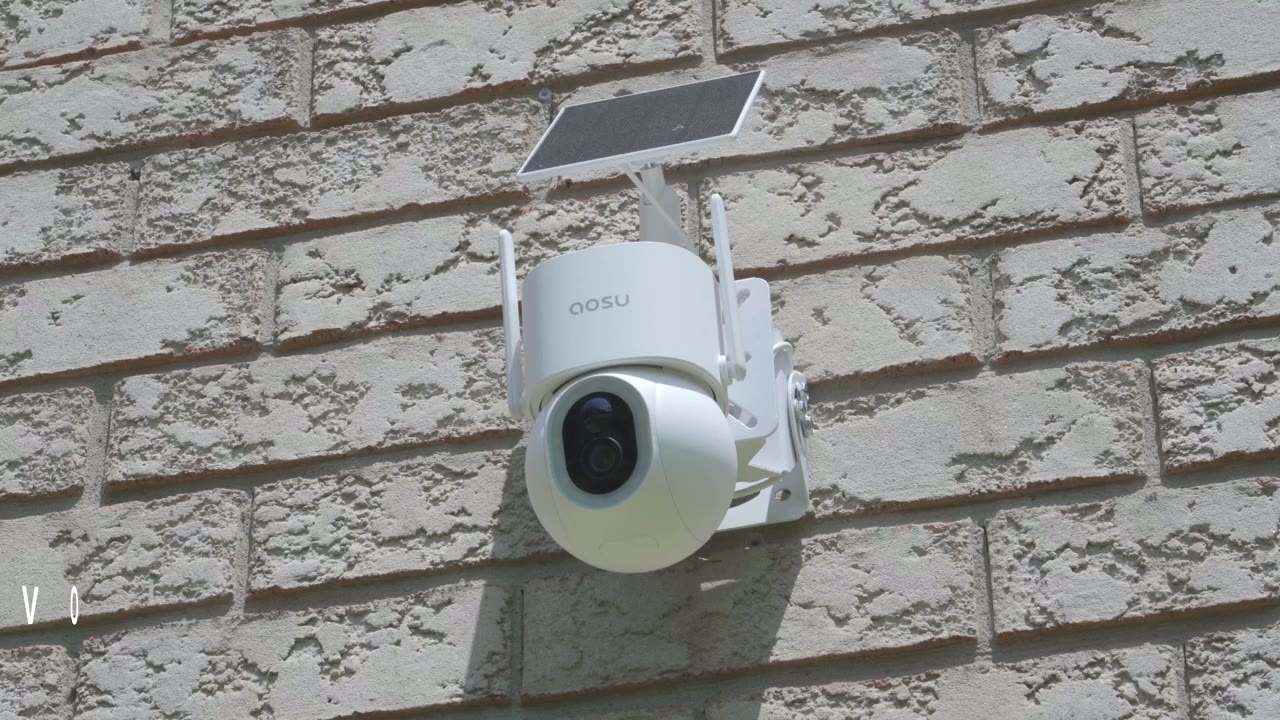
lens with a bunch of different sensors and then we have an LED ring light capable of 400 lumens of light output at the very bottom we have the slot for the micro SD card power button and reset button and the micro SD card accepts up to 8 GB on the very rear we have the speaker and you can see this is fully articulating so you have 360° coverage wherever you want to take a look at we also have the ASU logo on the top to two adjustable Wi-Fi antennas this runs on the 2.4 GHz Network and then on the very back we have the mounting area so this is meant for wall mounting now there is pre-and wiring and it does have a USB type-c connector in which is going to interface with the type-c connector end on the solar panel here and you could see that this nicely closes up so it maintains a good weather rating here’s a nice little design touch that I just noticed so whenever you plug in the camera to charge it like I am right now the there’s actually a green LED indicator light to let you show that the camera is receiving power or actively being charged good job on that ALU I really like that the camera comes in at roughly 687 G or about 1.5 lb so you should be able to mount this on most surfaces installation is very simple with the D1 Max so you’re just going to take the mounting plate that you see here drill in three screw holes into the wall or whatever surface you’re going to mount it on and you can notice the up Arrow here once you’re done just tuck this wire into this nacher cut out here line this up on the wall and then just slide the camera till you hear that satisfying click and then to remove the camera for any reason you’re just going to pull down on this tab and then just slide the camera so just make sure you install this you know at a decent enough height where someone can’t just grab it with the clip unless they have a ladder the solar panel is fairly standard and we have a screw Mount or screw thread right here which is going to connect to this articulating ball head now we do have the male connector and on the type-c cable on the solar panel which which is going to interface right here with the pre-and wiring on the D1 Max and then you just screw that in when you’re ready to maintain that weather rating now to install the mount it’s the same type of process you’re just going to set this up against a wall and drill in with three screw holes and if you want to make your life easier you can just remove the stem there you know line this up on a wall drill it in and then finally thread this in and once you have that nice and secure then you’re just going to thread in the screw here into the rear there position it and you’re
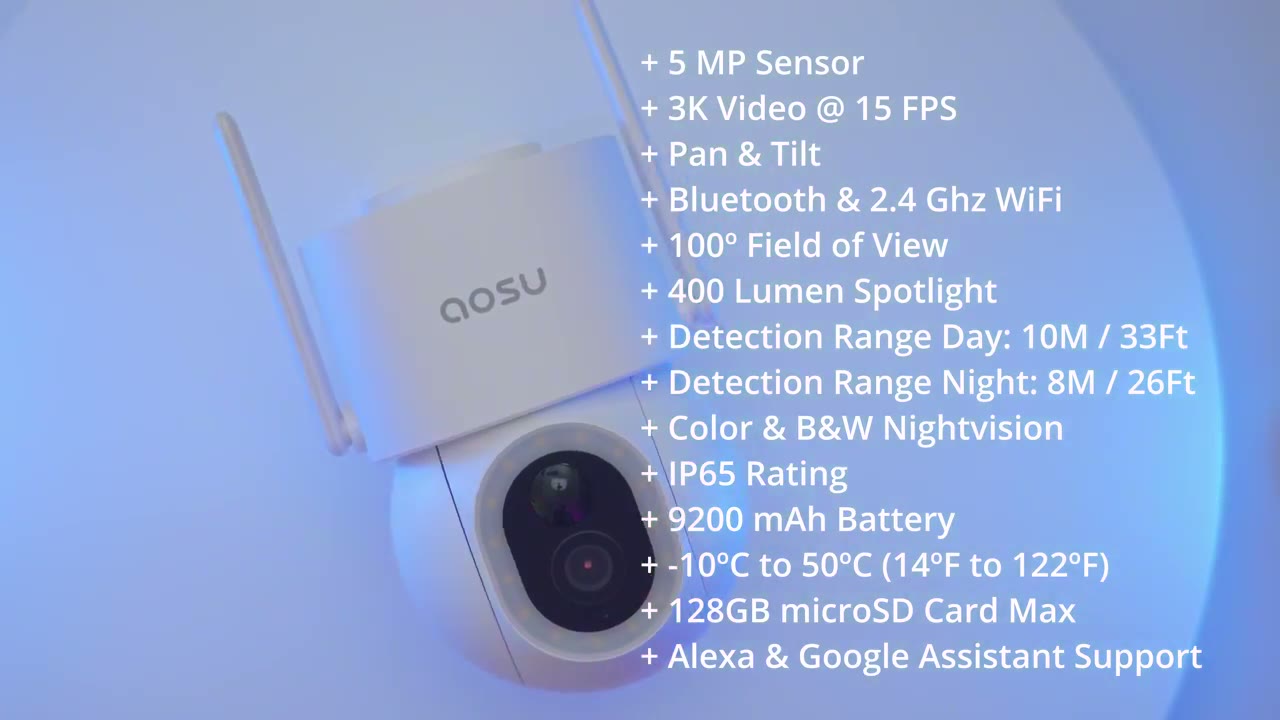
Specs
done specs include a 5 map sensor capable of 3K recordings at 15 frames per second we have pen and tilt functionality 2.4 GHz Wi-Fi support and bluetooth support 100° field of view 400 Lumen Spotlight the detection range is about 10 m or 33 ft during the day there’s black and white and color night vision an ip65 rating 9,200 Mah hour rechargeable battery operating temperature of -10 C to 50° C support for 128 G gab micro SD card Alexa and Google support I’ve opened the ALU app
App Setup
I’m going to add the camera to the app I’m just going to press and hold the power button hello all right so we’re ready to go so I’ll just click the plus sign here and then I’m just going to scan well actually it’s already found it I guess by bluetooth that was very convenient I’ll click add and I’m just going to select a 2.4 GHz Wi-Fi network once I’m presented with the Wi-Fi SS IDs now if if you’re not sure if you have a 2.4 or 5 you may have to contact your ISP to confirm that but I’m just going to put in my password right now the camera is connecting to your Wi-Fi network it may take a moment please wait for a while save settings successfully all right so the camera is now added to the home network you could see connected successfully that took literally less than a minute to do the D1 Max is added to the ASU app and before I install just like to open up live view to make sure it’s going to connect without any issue and we’re good to go all right
App Settings
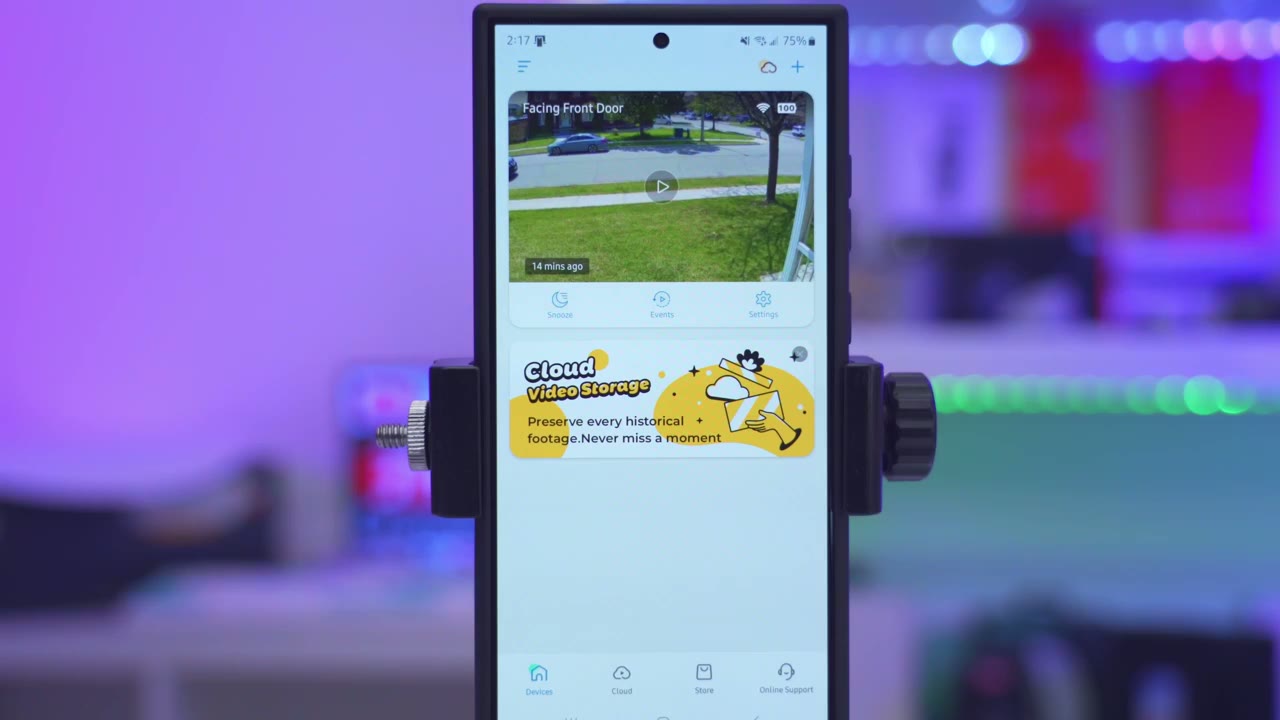
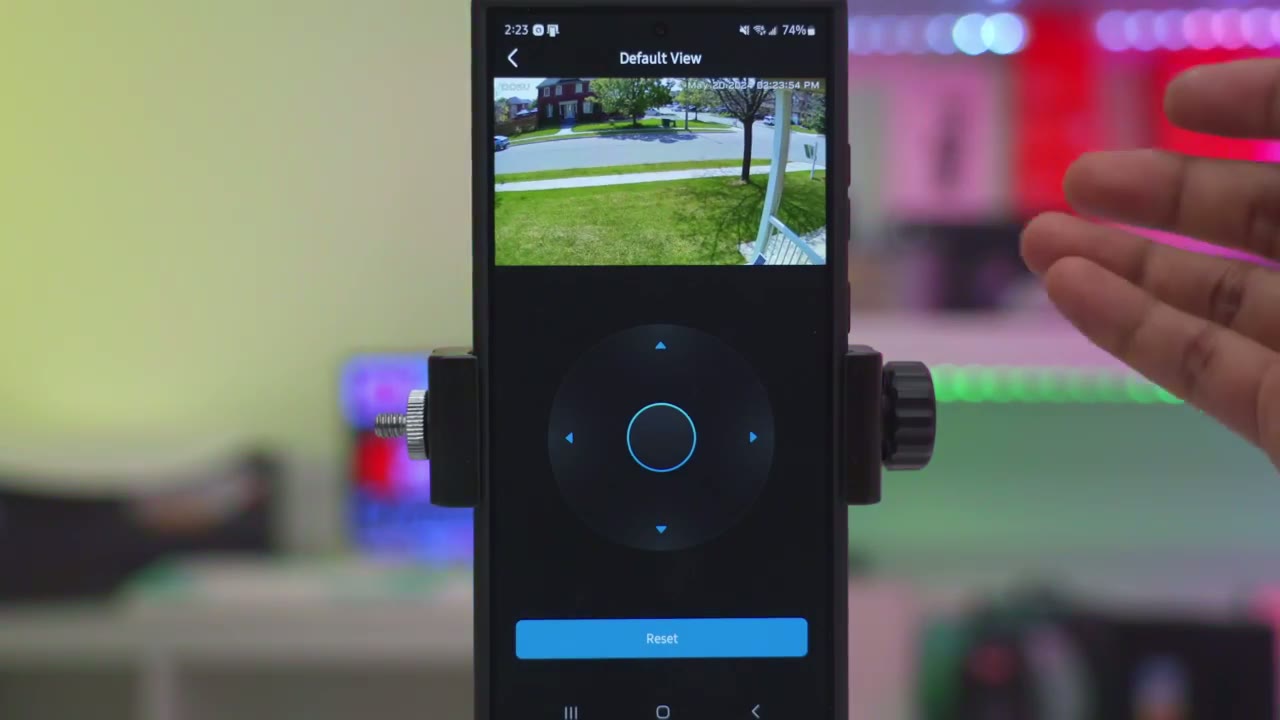
let’s take a look at the ALU app settings so as soon as you launch the ALU app you could see the battery life I’m at 100% cuz it’s been super Sunny we can also jump into live view we can go ahead and snooze the camera from 30 minutes up to 12 hours we can also take a quick look at events and you see there’s two options there either you could look at the cloud events if you choose to have the cloud option or we can take a look at local events which I’ll get into later but let’s go into live view right now let that pull up and you can see that pulls up fairly quickly now from here we can also jump into events we can change it from UHD to standard definition if your bandwidth isn’t enough I’m going to leave it on UHD and you can see there’s quite a bit of detail I could punch and I can see this car coming here can zoom in a bit more so the quality on here is pretty fantastic I can also go ahead and start taking a manual recording if I see something interesting and then I can to stop that I can also go ahead and turn the volume on or off and I could take a photo snapshot as well now if we look at the bottom here you can see we can go ahead and manually pan and tilt the camera and I can also go ahead and hit this 360° View and it’s just going to do a 360° pan around or look now I did create a panoramic Stitch so if I tap on the corner there you’ll see it’ll automatically pin and tilt to my back backyard fencing there and I can go ahead and take a look at my front entryway so this is a really cool option to have you can just tap anywhere you want and the camera will just go there looking at the bottom we have the option to turn the light on manually or not you can also activate a voice filter I’ll Dem with that later two-way talk and then you can go ahead and trigger an alarm manually as well and then if we go into more there’s some preset voice alerts that you could play I’ll demo that later and then you could turn tracking on or off so if you just want the camera in a fixed position like this just turn it off but if you do want that AI motion track and go ahead and turn it on and then we can calibrate the camera as well I almost forgot but when you’re in live view you could just go ahead and make this full screen as you like and then you could just zoom in a little bit more to see detail and of course you also have access to the other commands let’s take a look at the full options and I can see that the camera is on I can also go ahead and share the device if I wanted to with family or via email now if I go into AI surveillance this is where you’ll want to turn on a bunch of options so human detection that’s on by default now there is intrusion detection if you turn this on what you can actually do is to define a detection Zone you can see I’ve made it my front lawn here and then you could add more zones if you like and that way if someone goes on there you can go ahead turn on the alarm so for example if I turn on the alarm right here instead of setting it to a Smart Alarm I can just go ahead and set a custom alarm and I can say that hey I want the LED light to come on and I want the alarm sound to play and I want to play either like a siren alarm a this is a private area or you’ve entered a high definition surveillance area and you could change the volume level of that as well I’m just going to turn that off for now though and then you can see you can also set it you know do you want it all day every day or do you only want it say at night during the days or maybe at night during the weekends so you do have a bunch of customization functionality there now vehicle detection I do have that turned on and there is also this feature called parking Garden now this is ideal if you have the camera installed on your driveway I do not but this is a feature I’ve tested on some of asu’s um flatlight cameras and it works really well but basically you set up a detection Zone like I showed and then you know you would set your alarm as well and it’s just going to detect Intruders and play that really cool feature under detection settings we could set it to detect all types of motion or only set it to intelligent detection now say you just wanted to detect humans in vehicles and not animals you can go ahead and deselect that now track motion is that AI tracking you can turn that on or off from here as well and then for detection sensitivity you can set it to adjust automatically or you could set it to far so it’s going to track as far as the camera is capable of there is also pet detection and this is in beta testing so it may be a little bit hid and Miss but let’s go into notification settings now so I’ve set it to receive push notifications basically each day you know all the time so you can go ahead and tailor that if you don’t want to be bothered as much and I’ve set it to immediate mode so there there isn’t going to be any type of you know intelligent analysis of whatever is going on and then you can also set if you only wanted to receive an alert say if someone intruded or if there was someone in the parking area but maybe you don’t want to be notified of you know a pet or someone just passing by Cloud recording is really only going to be available if you go ahead and get the trial or if you go ahead and pay for it and this is going to store your recordings in the cloud so playback is going to be a little bit faster you also have more intelligent AI analysis and if someone seals your camera your recordings are safe but generally I don’t pay for the cloud ples we can also go ahead and set a default view for the camera so it just kind of returns there you could just go ahead and pan and set that as you like now let’s go into audio and video so for streaming quality you can set it to 3K streaming or smoothing mode if you know your bandwidth is not as great but it just automatically default records in 3K quality night vision mode you could leave it to automatic switching but I have it set to White Light AED illumination because I just want color night vision and then you could set it to Black and White Night Vision as well and then you can also change the speaker volume and this gets super loud which I’ll demo when I test the alarms and of course you can set if you want to record it with sound or not and you can from here just change the adjustment of that 400 Lumen Spotlight under battery management you could see that I’m at 100% battery so since I’ve installed this it’s pretty much been around the say 96 to 100% mark because the solar charging is just fantastic honor especially with the sunny days since it is pretty much summer here now you could set this from you know 20 second recording as a clip length maximum if you know it’s been kind of overcast you want to conserve battery life or you can just leave it to intelligent motion detection and clip lengths can be you know a maximum of 60 seconds depending on what this system sees fit you can also set the camera to go ahead and sleep during certain times of the day so you just want it to be sleeping during the day while you’re at home and only active at night you can do that right there you can also set the status LED light to stay on or off I like having it on so people see that the camera is actually you know working and hooked up so they know it’s actively recording and then you have access for Alexa and Google Now if we go to about device you can see that this is the memory card so I have 128 GB micro SD card inserted and it’s only used about 1.2 gigs now it’s only been a couple days but obviously you’re probably going to get months of storage since this is only event based recording it’s not 24/7 recording and you can see that I have pretty good Wi-Fi strength to review
Video Playback
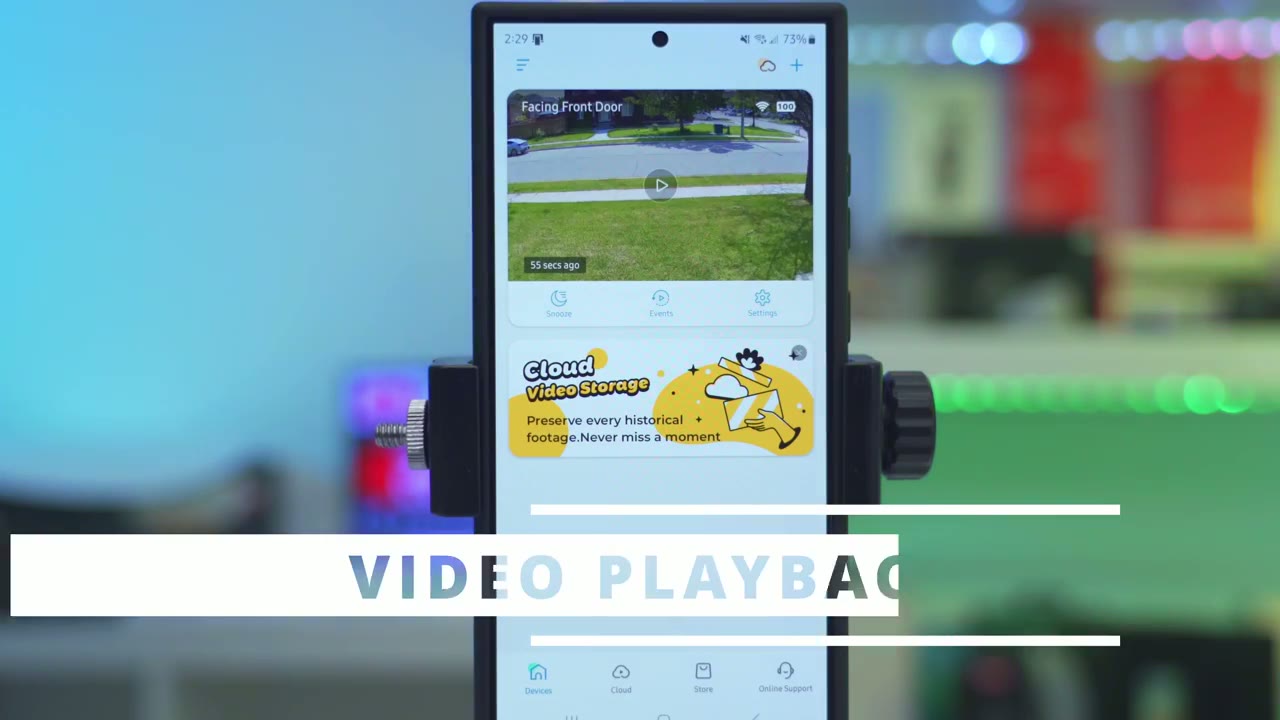
recorded video it’s really simple we’ll just tap on events and it’s going to default to local since I don’t have the cloud plan on here now you can see once that loads up it loads up fairly quickly and if I wanted to download this clip I would just hit the download Arrow here and that’s just going to download quickly to my camera’s album and then I can just go ahead and share it from there and then it’ll just automatically play the next clip now you can see it’s actually categorized there so it shows motion if I keep going down it shows passing if someone’s staying or lingering and then when I was testing the alarm detection or the intrusion area you can see it’s tacked by that and of course you can also go ahead and filter by those as well if you just want to F tune whatever type of video you’re looking for but it’s very effortless to do by the way if you’re finding this video helpful please consider liking and subscribing but let’s get back to it the
Video Quality

3K video quality was also really good on here images were nicely exposed and during the day it didn’t matter if it was like early morning midday when there’s more harsh lighting or you know towards desk all the images were clear easy to make out details and you know of course effortless tracking by the camera now when it came to night vision video you do have the option to set it to color night vision black and white night vision or you can set the camera to just intelligently the side I do like having it on the color night vision because the spotlight is so bright at 400 lumens and since I do have good weather recently you know I’m still getting excellent battery life even with that Spotlight at full brightness the motion detection
Motion Detection
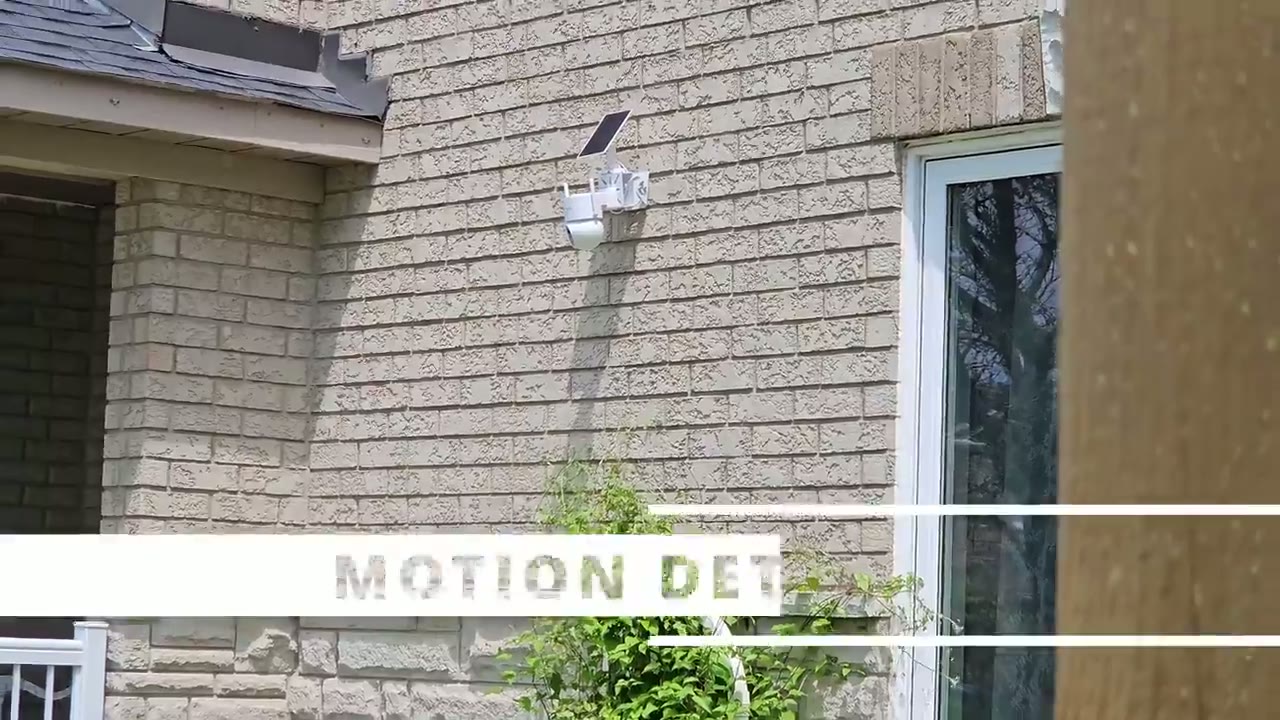
distance on here has been pretty good so I tested it at about 30 ft out or close to 10 m and it easily tracked me now one thing I can’t confirm because I didn’t check with auu but I kind of have an inkling is that there seems to be a little bit of a cool down time in between motion detection events which I didn’t find with the wired version of this camera I think it’s because it’s a solar powered camera it has to conserve battery life so once it detects me walking or detects any type of motion it just fully tracks them till the camera just kind of reorients back to the default position and then you know maybe you have to wait say 5 to 7 seconds until it picks back motion up again and again I think there’s a built-in cooldown time something to be mindful of once the camera actually detected me and started tracking it was only about say 2 to 3 seconds until I would get the alert on my phone then I would tap into it and it loaded the ALU app up pretty quickly now this is with me setting notification type to the immediate mode you do have the option to set it to the intelligent mode where it’s going to do a bit more analysis before it pushes the notification out to you so I like
Pan & Tilt
leaving the camera on the AI tracking so it just automatically pans and tilts anytime it’s tracking something but you can also manually do this anytime you want and you can also use the panoramic Stitch functionality it’s just going to generate a panoramic image of outside or whatever the camera is seeing you can tap anywhere on that image and the camera will automatically pan and tilt to that area and of course if you just want the camera to be set up kind of static without any pan and tilting you just have to turn the AI tracking on or off and then just set the ca camera’s default position in the ASU app if
Deterrent Features
you’re looking at the turn features there’s two main ones in the ASU app so there’s an intrusion detection and then there’s parking guard so for the intrusion detection which I tested out I just kind of outlined an intrusion area on my front lawn and you could customize the alarm so you could set it to have the spotlight come on and you can have the alarm come on you could set the volume how loud it is and what it actually plays and that work really well here’s a demo of that so that speaker gets very loud and I’ll demo a little bit more later now there is also a parking guard feature I didn’t get to test this because I didn’t install this on my driveway but I did test this feature on asu’s fud light cam app and I’ll just play that so you can have an idea how that works do not approach the vehicles stay clear this is what to talk sounds like
Speaker
on the high volume setting it took what the voice sound and it turned off please put the package at the door thank you hey what are you doing here please get out of here now the spotlight on here is
Spotlight
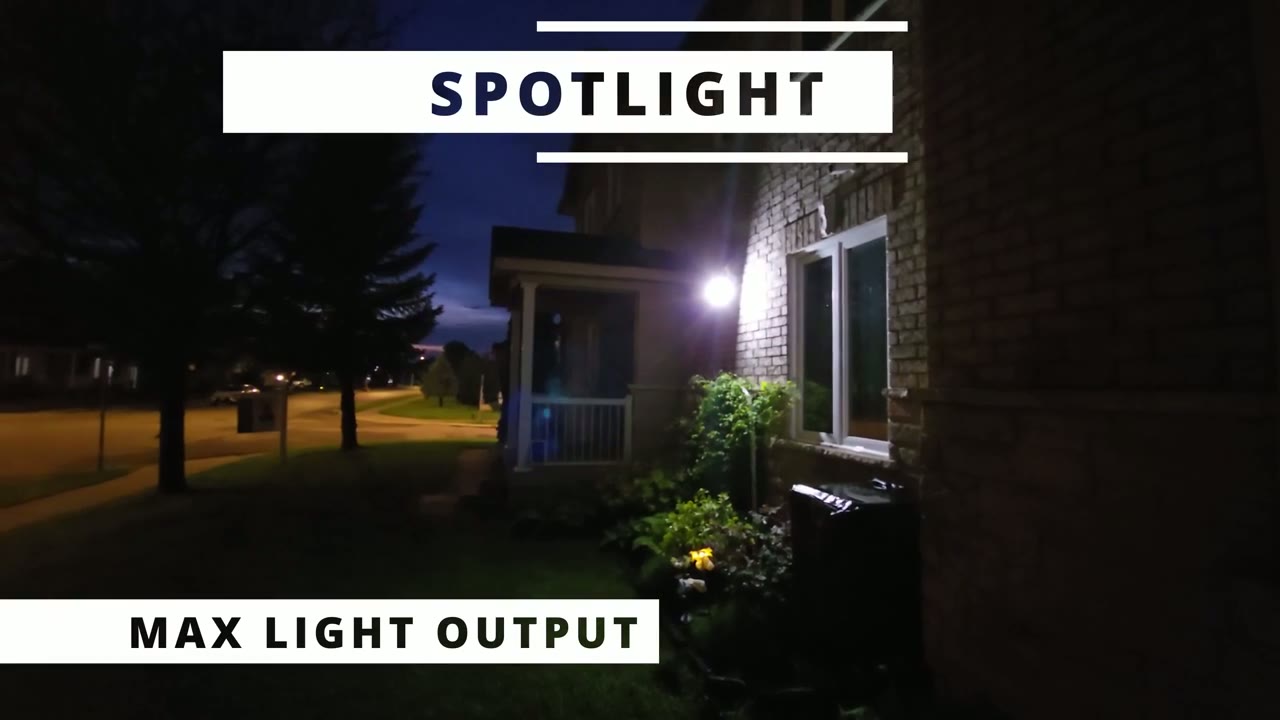
also plenty bright at 400 lumens it did an awesome job Illuminating the front entryway and this makes a great deterrent if you’re going to be installing this on your driveway it’s easily going to just illuminate your car in light and it also does well for night vision video the battery life has been
Battery

fantastic on here so when I installed it it was at 100% and right now it’s hovering between say 96 to 100% And that’s because I’ve been having you know really great weather it’s almost summer here except for one day where there was like a thunderstorm but yeah 96 to 100% it’s really good and that’s based on me setting it to the intelligent detection instead of just detecting everything that it sees so it’s kind of prioritizing humans vehicles and pets and it’s also set to automatically adjust the motion detection range now the spotlight is set to the full brightness at 400 lumens for night vision video and yeah I’m still getting around 96 to 100% you know by the end of the day of charging I also want to add
Build Quality
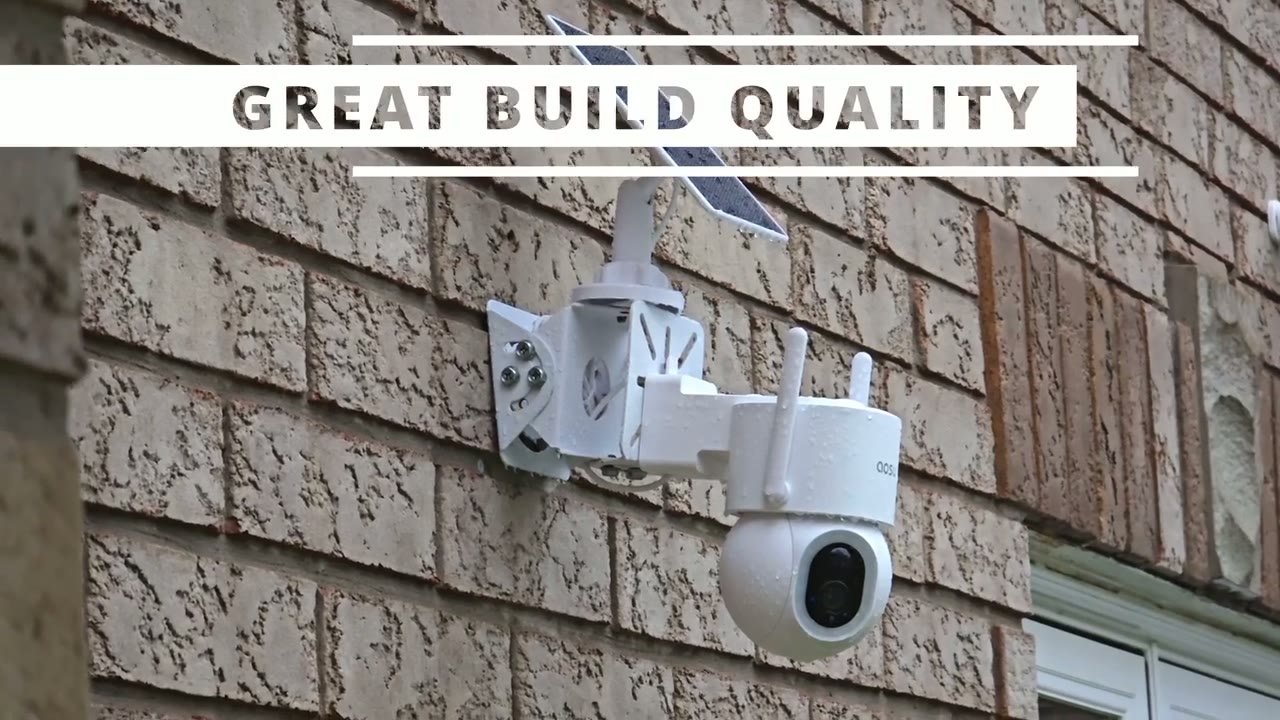
that the camera has actually survived a pretty severe thunderstorm lots of high winds and a lot of rain and it had no problem thanks to that ip65 rating I
Storage
inserted a 128 GB micr SD card and I should be getting between 7 to 8 months of video playback history based on the settings that I have in the ASU app which is to just have kind of intelligent recording people vehicles and pets and just to ignore all other type of motions so the ASU solar cam D1
Recommended?
Max is a fantastic option if you’re looking for a solar powered camera and you do have a ton of functionality you have 3K video and if you want the turn features you have that bright 400 Lum Spotlight and super loud speakers with the alarms there’s also automatic panning and tilting great ip65 rating and there’s zero monthly fees and if you’re using a camera from a brand where you have to pay monthly for full functionality definitely check out the ALU solar cam D1 Max I’ll leave some links down below for you to learn a bit more or to pick one one up for yourself if you prefer a camera that has 24/7 recording and you don’t mind simple wiring check out my review of the ASU D1 SE camera I’ll link that up above and the difference is that that has 24/7 recording and you can insert up to an impressive 512 GB micro SD card because it’s recording continuously and don’t forget to check out some of my other reviews as well and as always if you found this video helpful please help me out by liking and subscribing and I’ll see you in the next one soon
Buy AOSU SolarCam D1 Max on Amazon
Buy AOSU SolarCam D1 Max at AOSU
Please note that some of the links in my video descriptions are affiliate links where I earn from qualifying purchases. As an Amazon Associate I earn from qualifying purchases.