


Buy Redtiger F77 Dash Cam (4K+4K) on
Buy 512GB microSD Card on Amazon
Buy 256GB microSD Card on Amazon
Please note that some of the links in my video descriptions are affiliate links where I earn from qualifying purchases. As an Amazon Associate I earn from qualifying purchases.
Intro


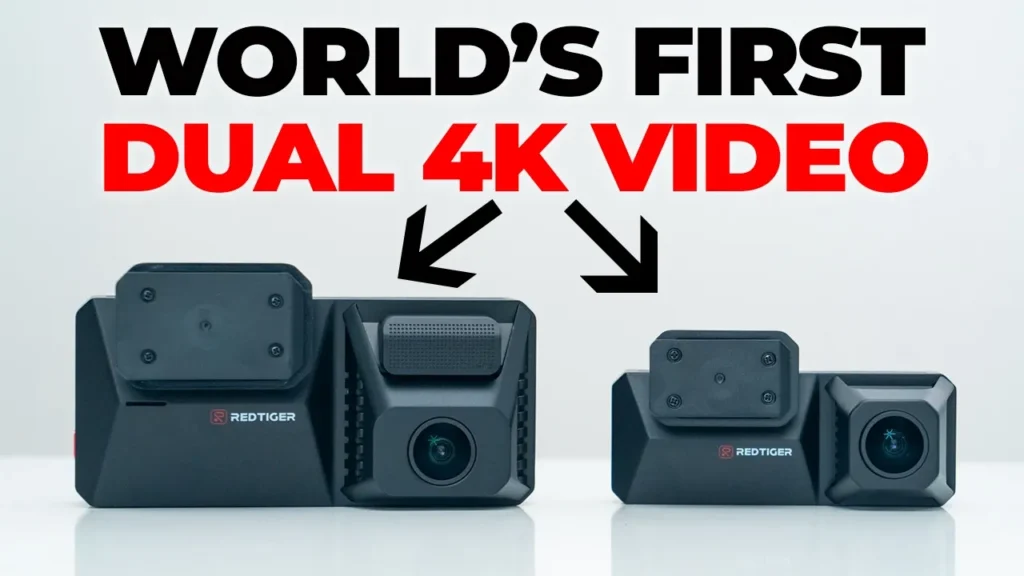
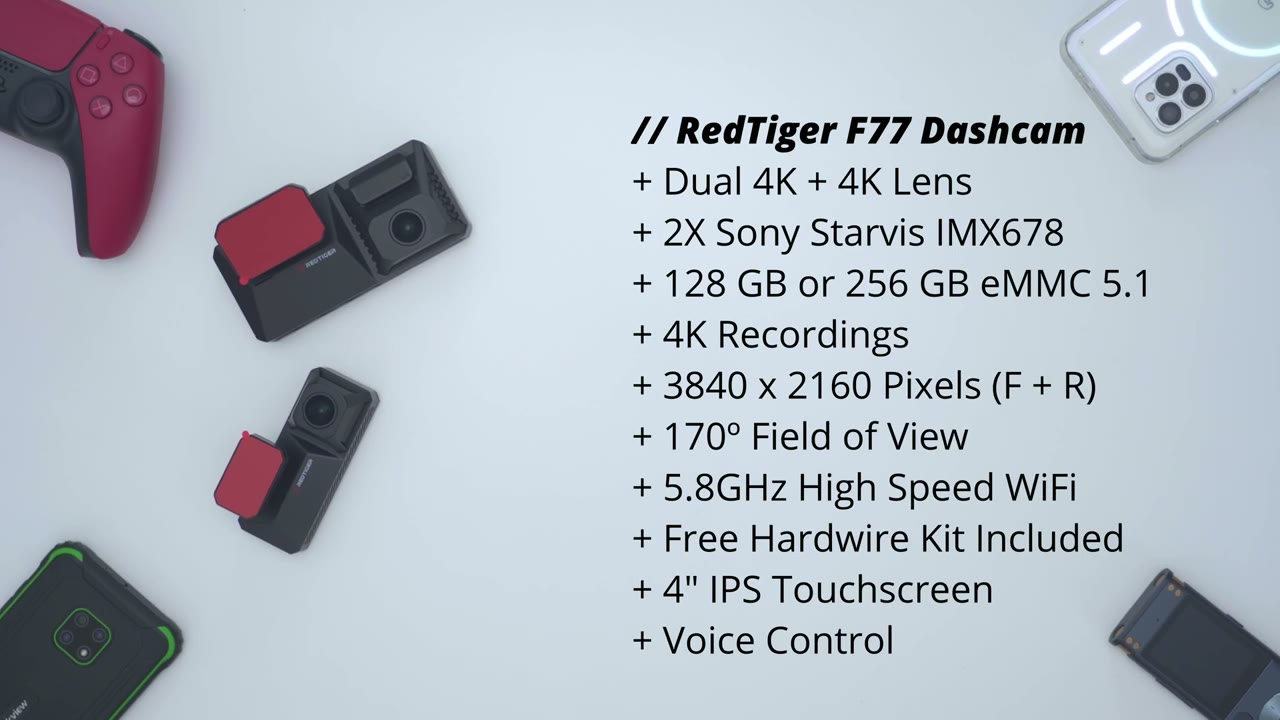
Hey, it’s Adrian. And if you want high quality 4K video recordings for both the front and rear of your car, you should check out the Red Tiger F77 dual 4K dash cam. This is the world’s first dual Sony Starvis IMX 678 front and rear 4K dash cam, which means you get sharp 4K videos, a wide 170° field of view, letting you see everything. It also has built-in local storage, so there’s no need to buy a separate micro SD card. There’s a GPS module, smart voice control, a large 4in IPS screen with touch functionality, time-lapse video for 24/7 parking monitoring, and more. Let’s take a look at how well it performs if this could be your next car’s dash camera. And a big thanks to Red Tiger for sending this out for
Package Contents
review. In the box for the Red Tiger F77 dash camera, we have the front 4K dash camera along with a rear 4K dash camera. We also have a mounting bracket for the rear dash camera, additional sticky pads for the rear and front dash camera, a full manual, quick start guide manual, four electrostatic stickers, a wire wedge tool to just tuck it into your vehicle trim. We have wire clips with adhesives pre-applied, USB type A to type-C data cable, a USB type-C to type-C really long extension cable to run wiring from the rear dash camera to the front dash camera. And then we have the main wiring, and this plugs into your car’s accessory adapter. You get the hardwire switch kit. You get a bunch of fuse adapters along with another wire trim tool and sticky pad for the wire kit. Let’s take a look at
Design
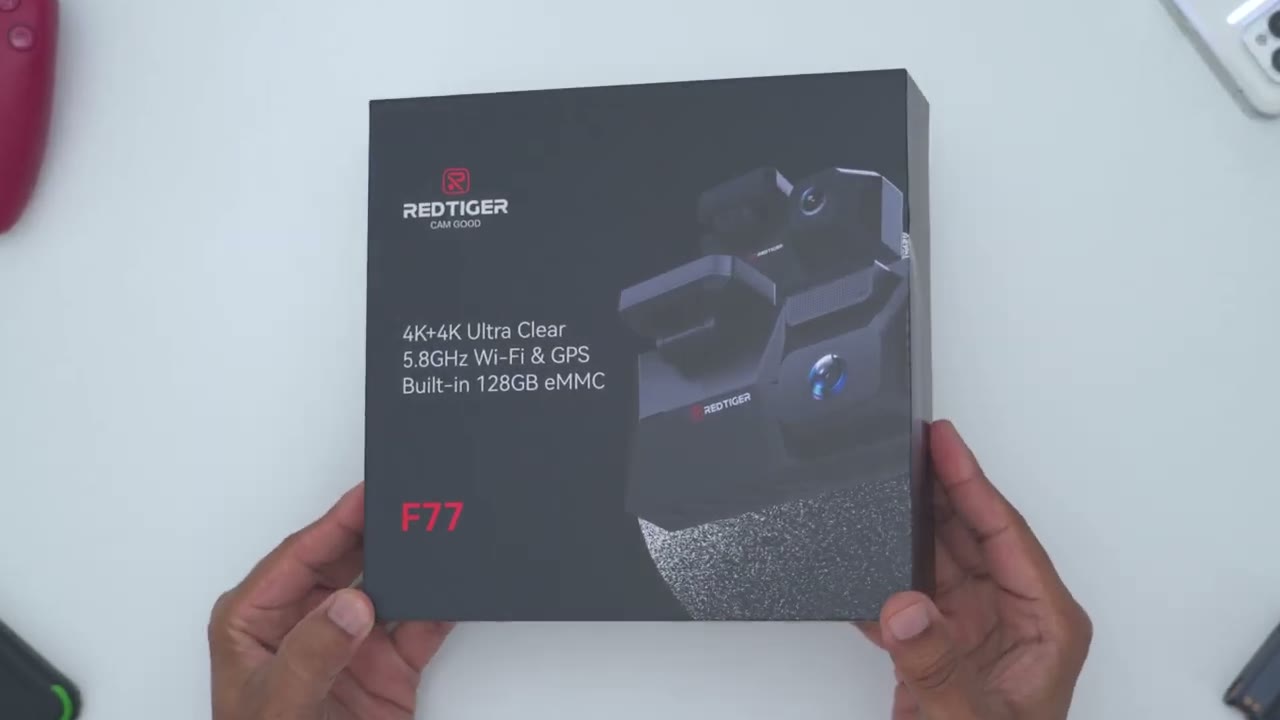
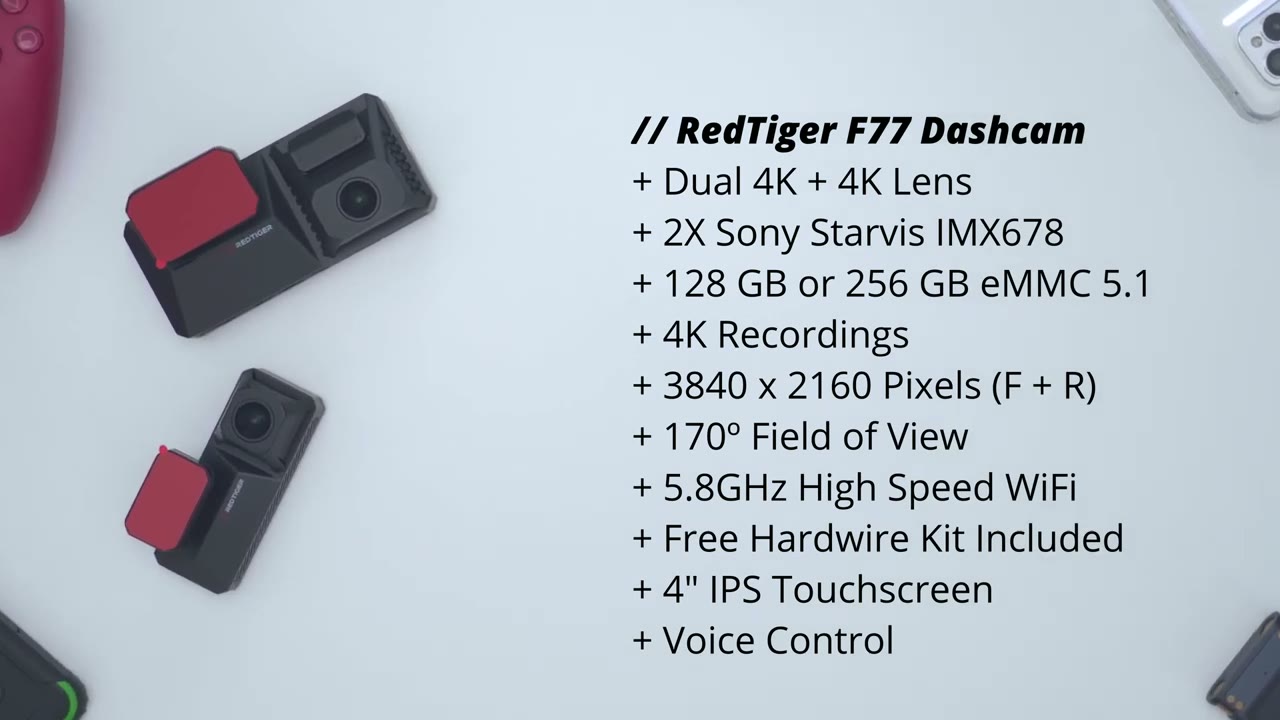
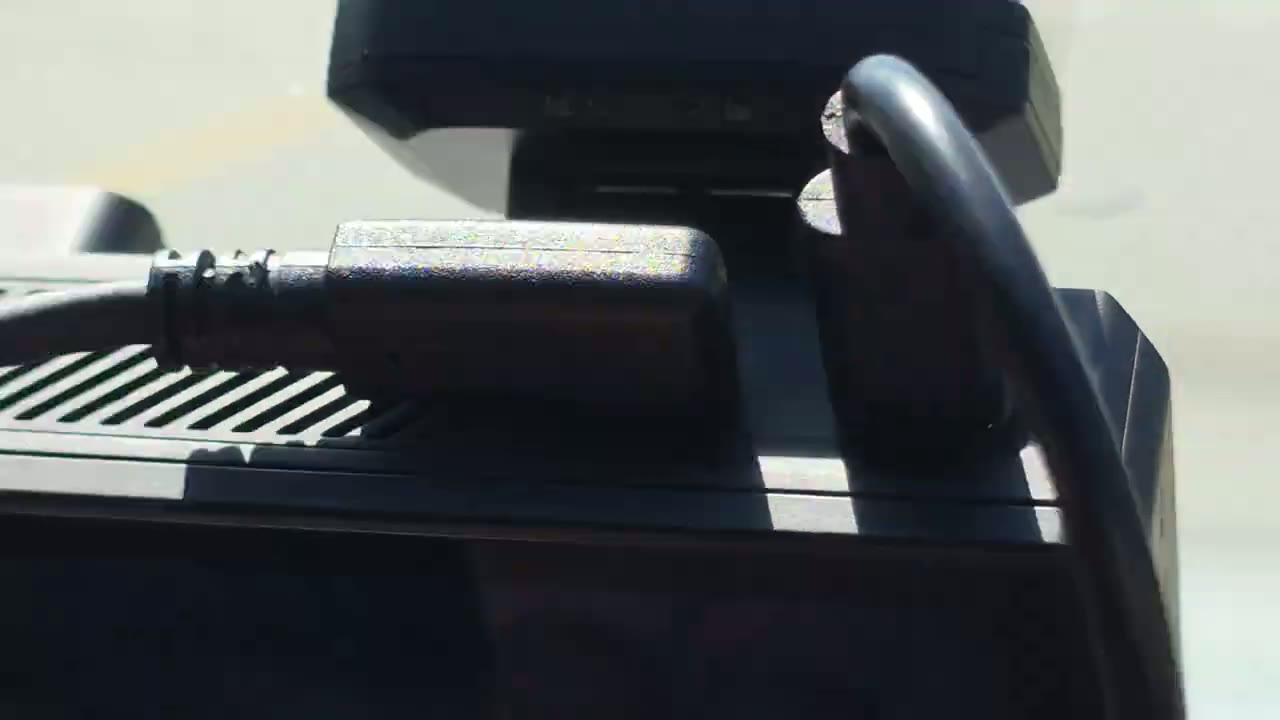
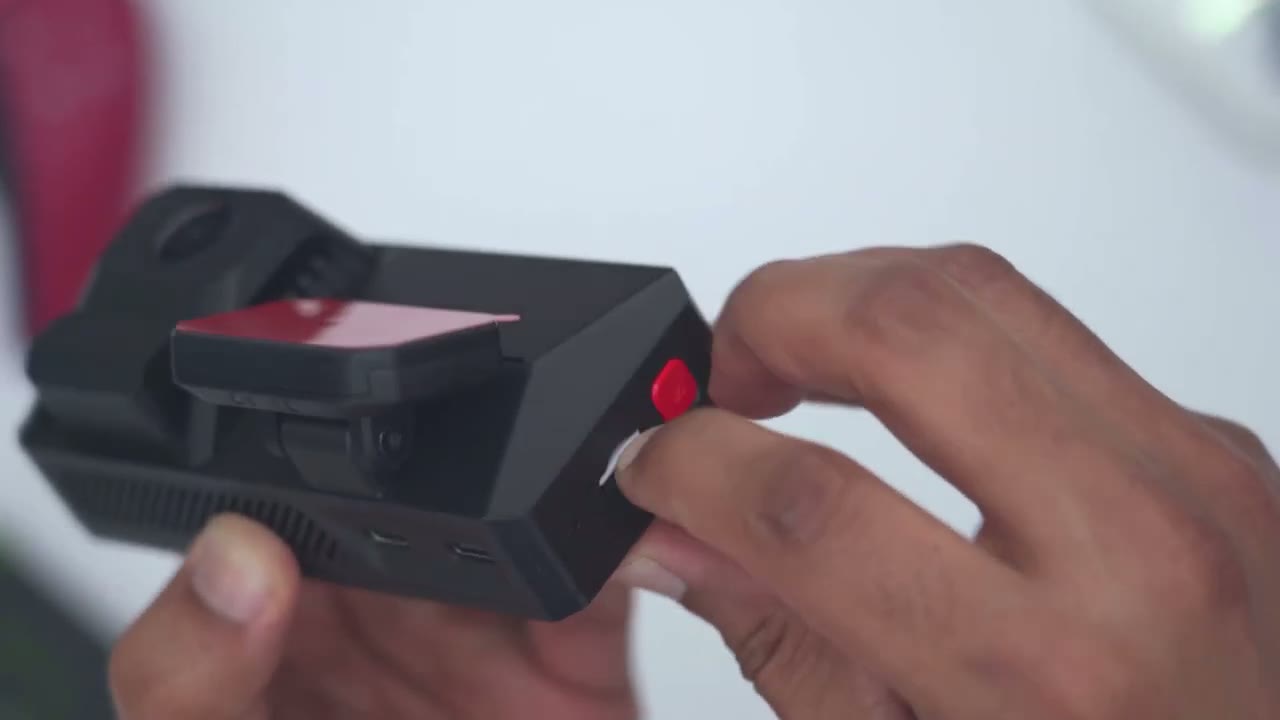
the design of the front dash camera. So, this does have a little bit of heft to it coming in at 191 g or about 0.4 lb. Now, I have the 128 GB version of this, but it also comes in a 256 GB version. So, we have the 4K lens on the front here, and that’s powered by the new um Sony Starvis IMX 678 sensor. So, we’re going to get great 4K footage out of here. We also have a GPS module at the front here, and then a sticky pad to attach it to the windshield. And we also have the Red Tiger logo. Now, if we do a side view, you could see that this mount actually articulates. And if I just go ahead and articulate it up and shake the dash camera, it’s not shifting out of place. So, it’s nicely frictioned. Now, on the side here, we have a reset port, a micro SD card slot, and I believe the power button.
You may be wondering, well, why is there a micro SD card slot if you said this has internal storage? Well, it does have internal storage. The micro SD card slot is meant for you to just transfer the data from the dash camera to the micro SD card slot if you wanted to, you know, put this on your computer, laptop, etc. And then at the very top, we have two USB type-C ports. So, one is for supplying power to the front 4K dash camera. And then we have a rear one to connect the rear dash camera as well. On the bottom, we have the menu button, navigation arrows, and okay button. And these are all tactile button presses, which is nice to see. And then we also have that very impressive 4 in IPS screen that also has touch functionality.
And similar to the rear dash camera, the mounting bracket can actually be slid out. So, I’ve just already removed it and just slid right back in. So, once you mount this to your windshield, you can just slide the dash cam body right off of the mount. The rear 4K dash camera is much more compact and lightweight, coming in at around 79 g or about 0.17 lb. So, again, we have another mounting pad right here. And then this can also be articulated to adjust the angle. And then the mounting bracket also slides off just like I showed with the front dash camera. And then on the side, this is where we have the type-C port. We’re going to use that extension cable to connect this to the front dash camera. And then we have various ventilation grills all around.
And of course, that 4K lens to give us that crisp footage. Here’s a quick look
Specs
at the specs. Feel free to pause to review or jump ahead to the next
App Pairing
section. I’m going to add the F77 front dash camera to the Red Tagger app before I permanently wire everything. So, I’ll just launch the Red Tiger app here and I’ll tap on add camera and I’ll just go through the setup right here. So, I just plugged it in by type-C cable. Press the power button and it’s on. So, I’ll pick English and uh New York for time zone. And you can see it’s all touchscreen, but you can use the controls at the bottom as well. Now, it says install the camera powered on. So, it is powered on. I’ll click next. And it says connect to Wi-Fi. So, I’ll tap on connect to Wi-Fi. The default passwords are 1 2 3 4 5 6 7 8. So, what I’ll have to do is I’ll have to actually um turn Wi-Fi on the dash camera. So, we’ll go into settings here.
Go to Wi-Fi and I’ll pick 2.4 for the setup. And this is saying Wi-Fi turning on. It shows the default password here. 1 2 3 4 5 6 7 8. And that’s the Wi-Fi name I’ll have to connect to. So, I’ll wait to see if I can find that in here. And there it is. Red Tiger. So, I’ll go one, two, three, four, five, six, seven, eight. Just make sure that’s correct. Yep. Hit connect. And we can see it says Wi-Fi connection successful. So, now it’s connected to the Red Tiger app. So, now if I jump back into the app, give it a second here, and I can see it’s automatically pulled up live view. Here’s me running my hand. Let’s take a
App Settings
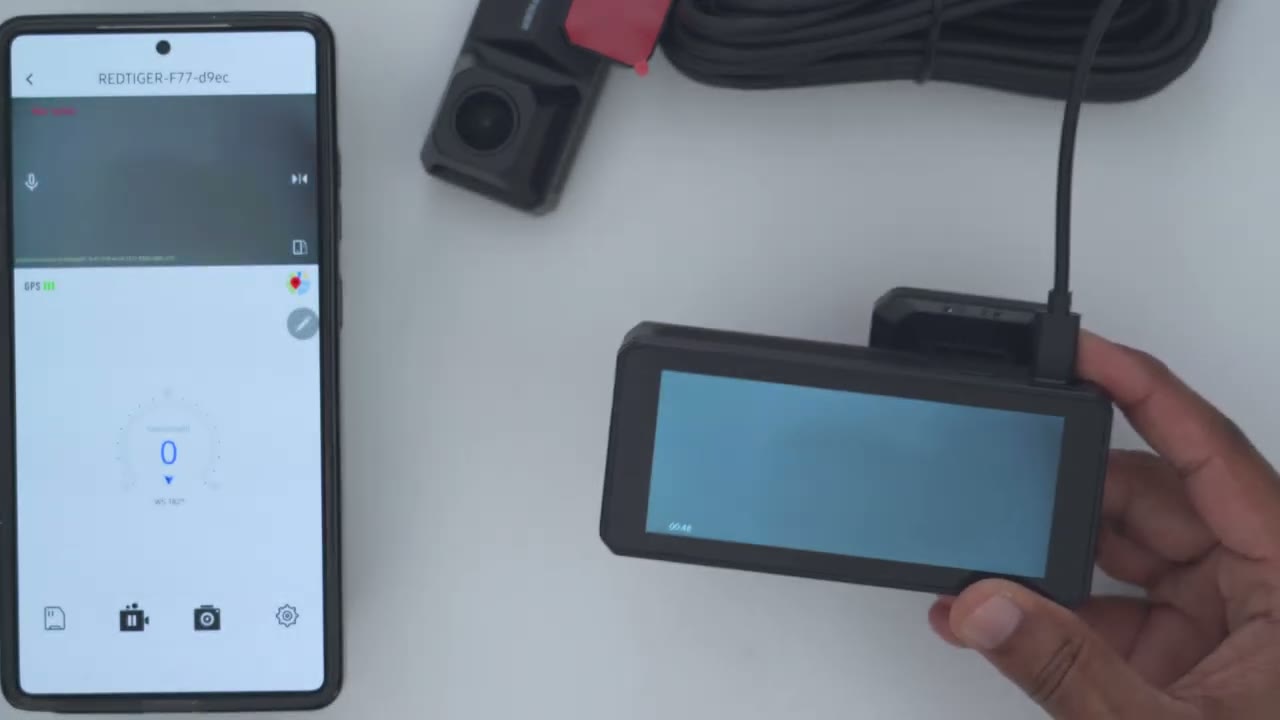
look at the app settings in the Red Tiger app. So once you open it up, you could see the camera view or live view for both dash cameras. So there’s the front dash camera and then the rear dash camera. So the rear dash camera feed is in the top right corner here. Of course, you can go ahead and switch the camera view so that the rear one is front and center and then the front one is in the top right corner. And you may actually want to see the rear dash camera so you can see, you know, if anyone’s coming up really fast on you. So I’ll just go ahead switch that back. You also have the option to turn the microphone on or off if you hit the microphone icon. And then you could just also make this full screen if you want a bit more detail. I can also see the GPS signal strength.
And I could tap into maps. Now, if I was driving, I would see my speed here as well. Now, if I tap on the memory card icon, there’s two options. One is built-in storage. Um, and this has 128 gigs like I mentioned, but there’s a 256 gig model. So, what it’s going to do is actually going to retrieve the video clips from the dash camera. You can see most of it is just the setup. I haven’t started driving yet, but this is kind of grouped into loop uh video recording, snapshot, or locked. Locked would be if you know um the camera detects uh any type of collision or bump, it would lock that video clip. So, that’s um reading the video clips from the built-in storage. If we go into external storage card, I did input um or insert a micro SD card.
This is what I was using on a camera, not specifically a dash camera, but um you can see it’s actually pulling the clips from the micro SD card like really quickly, which is really cool to see. Now, I can see that it’s currently recording right here. It’s counting up. If I tap on this icon here, it’s going to stop the recording and you can also take snapshots as well, and that’s going to save to your camera album. Let’s jump into the full settings now. So, I can see that it is recording sound. And if we look at video resolution, we have two options here. So 4K 30 and 4K 30. So both front and rear dash cameras are going to record 4K at 30. That is just fantastic. And I believe it’s the first dash camera to offer um simultaneous 4K recording front and rear. Now we also have options.
You can have um 2.5K at 60 frames per second if that’s important to you or you can have um 2.5K at 30 and then 4K at 30. So, depends on, you know, which camera you want the best possible quality. You have a couple options. I’ll just leave it 4K 30 for everything. I just want the best quality all the time. Loop recording duration. You could set it from 1 minute clips to 3minut clips to 5 minute clips. Up to your preference. Now, collision sensing, it’s set to low. Um, this is just the sensitivity when your car gets hit. Um, so you can set it to low, medium, or high. I’ll leave it on low for now, the default. And then speed unit. I’ll switch mine to kilome. I am in Canada. And then the camera language. This is the languages available.
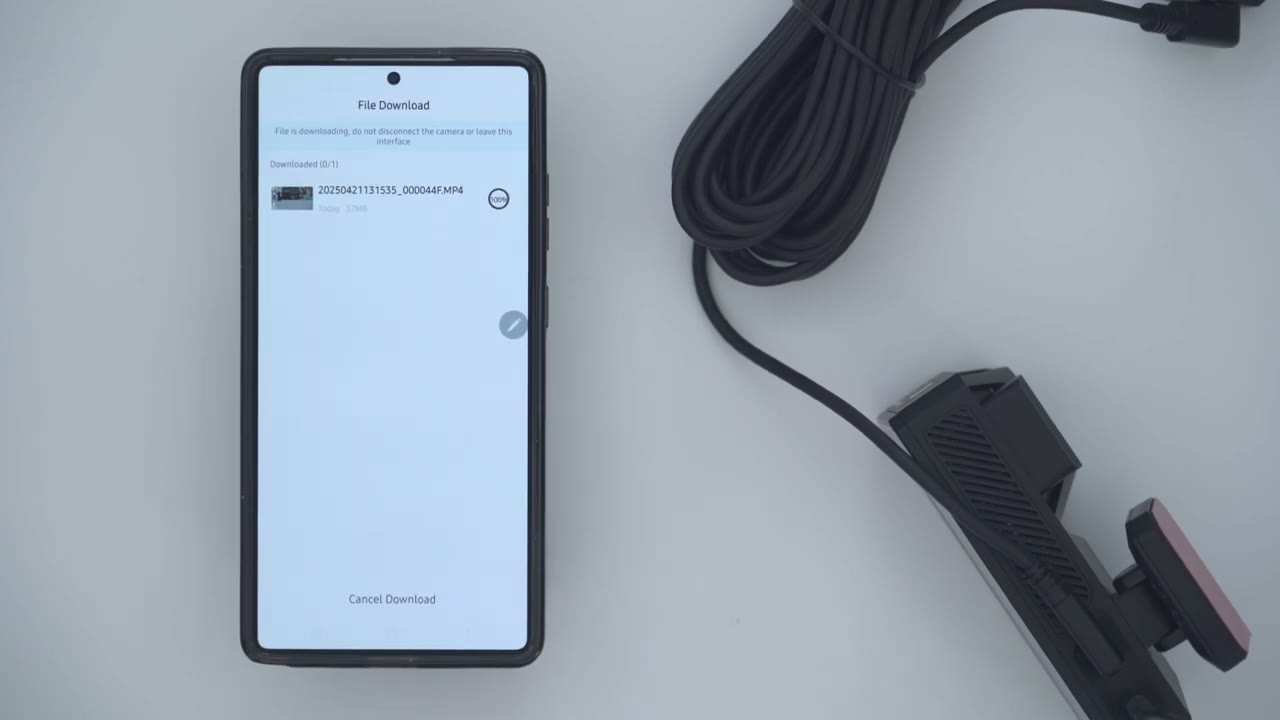
So, English, French, Spanish, Dutch, Italian, um, Mandarin, uh, Japanese, I guess, Turkey. So, those are what you have. And then we can see the Wi-Fi SSID. You could change the default password if you want. Um, firmware version. I don’t believe there’s a firmware update for mine. And you could take a look at, you know, how much storage is used internally and how much is on the card. And of course, you can factory reset everything. to download video files to your phone. We’ll just tap on the storage icon, go into the built-in storage since that’s the default recording medium. We’ll wait for all of the files to load up. And then once it does that, I’ll just tap on one of these video clips here. Hit download. And I could see it counting down there. So, it’s fairly fast.
Now, these are going to be um 1 minute clips. If you set it to three or 5 minute clips, it’s going to take a little bit longer. Just keep that in mind. Let’s
Dash Cam Settings
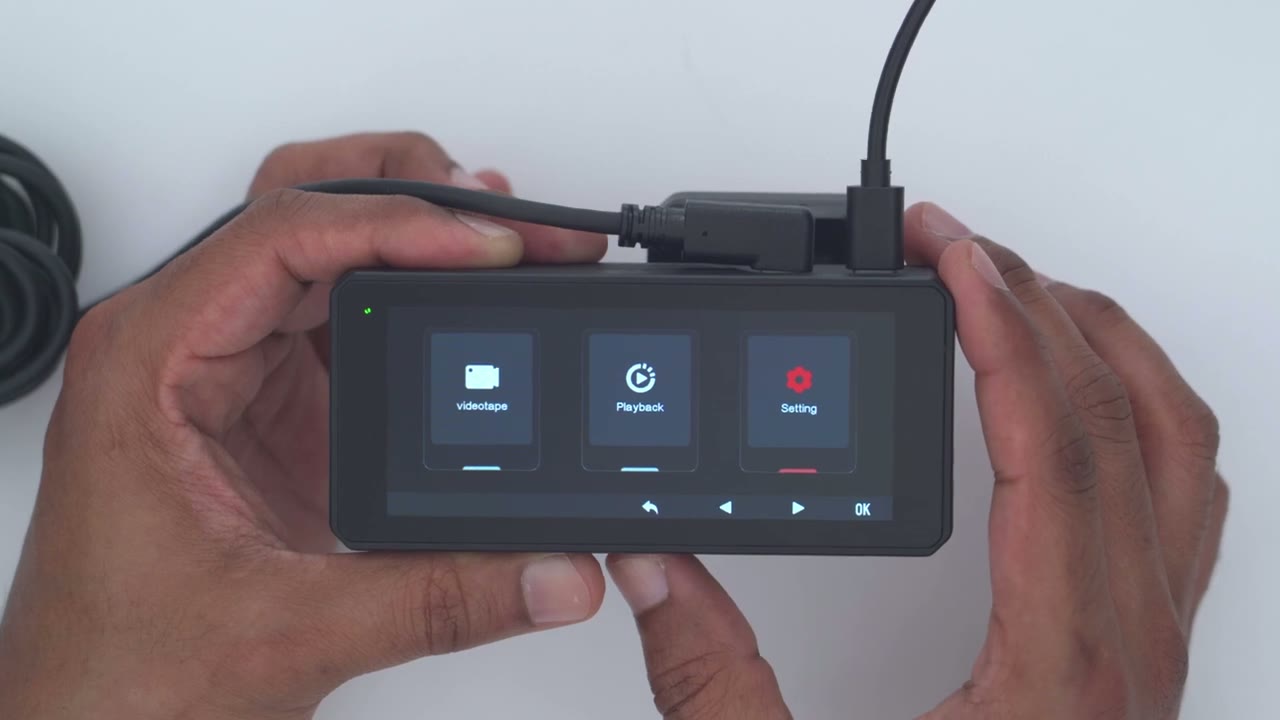
take a look at the full dash cam settings on the F77. since there’s actually more settings on here than in the Red Tiger app. So, if we tap the screen, we can see that it’s currently recording front and rear. We have a bunch of status icons. We can see the time and date. Now, there’s some quick uh access icons. So, if I press a button here, it’s going to take a snapshot. I could turn the microphone on or off. I can press the uh lock button here. And then I could go into the full menu, which is what I want to do. So, I could go into videape. I could go into video playback. Um, but these are things I showed in the app. It’s probably going to be easier to do this in the app than on here. So, let’s just jump out of here and let’s just look at the full settings.
So, um, under resolution, this is the same that was in the app. So, 4K 30 and 30. These are the other options. Let’s jump out of there. We could record sound, uh, loop recording. So, from 1 minute to 3 minutes. I’ve set it to three. Um, the G sensor. Again, the sensitivity is set to low. And then you can also turn on a fatigue reminder just to, you know, kind of remind you um, to take a break. I’ll just leave that at an hour. And then this is where we could turn Wi-Fi on. Again, this does support dualband Wi-Fi. Now, click tone. I’m going to turn this off. Um, just, you know, that can get kind of annoying. You can also turn on a screen saver after um 10 seconds, 30 seconds, 2 minutes. I’m going to leave it off.
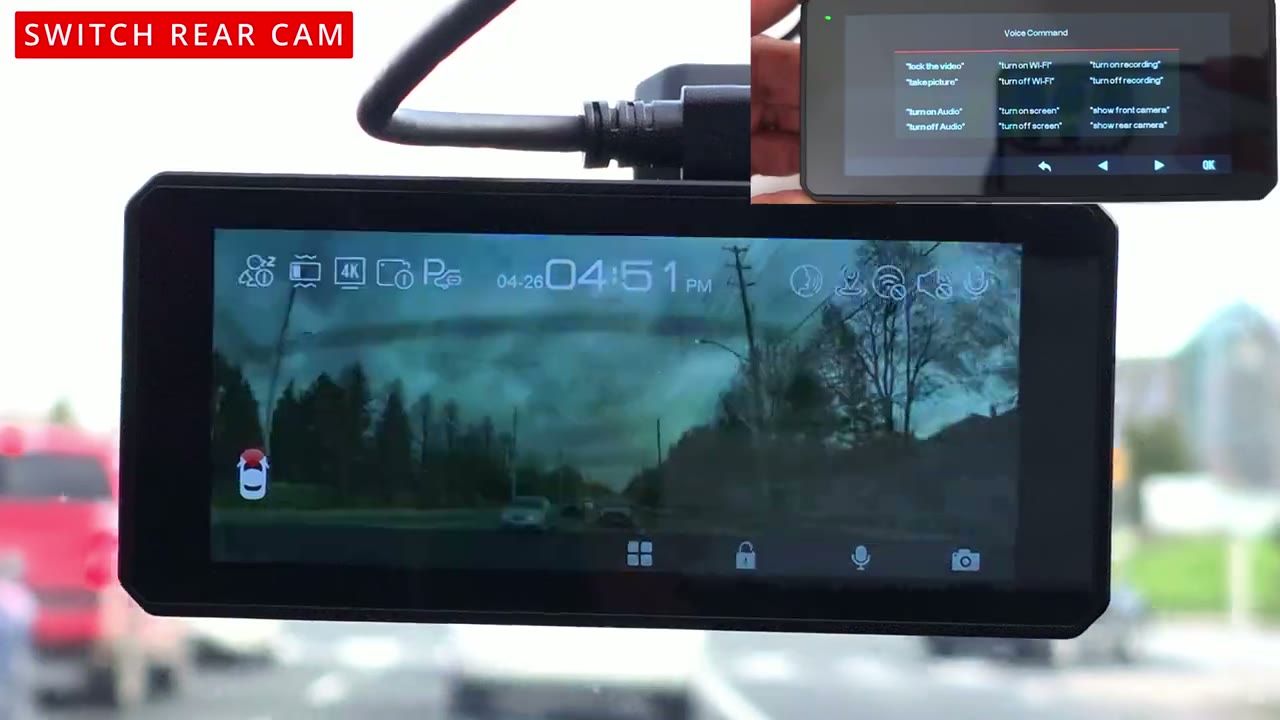
I like to see my dash cam screen on all the time so I know, you know, it’s actively on and recording. Now, under voice control, it is set to on. Now, if we take a look at the voice commands, this is what we have. So, we have lock the video, take picture, turn off audio, turn on audio, turn off Wi-Fi, turn on Wi-Fi. Uh, really handy. So, you don’t have to go into the menus for Wi-Fi, turn on screen, turn off screen, um, recordings, and show front or rear camera, and we will test all of these. I’ll let you know how accurate it is. Let’s just jump back here, and we can also do a mirror flip if you need to, depending on how you’ve installed this, and let’s just go down here. So, we have the rear cam flip as well. So, you can flip the front and rear independently.
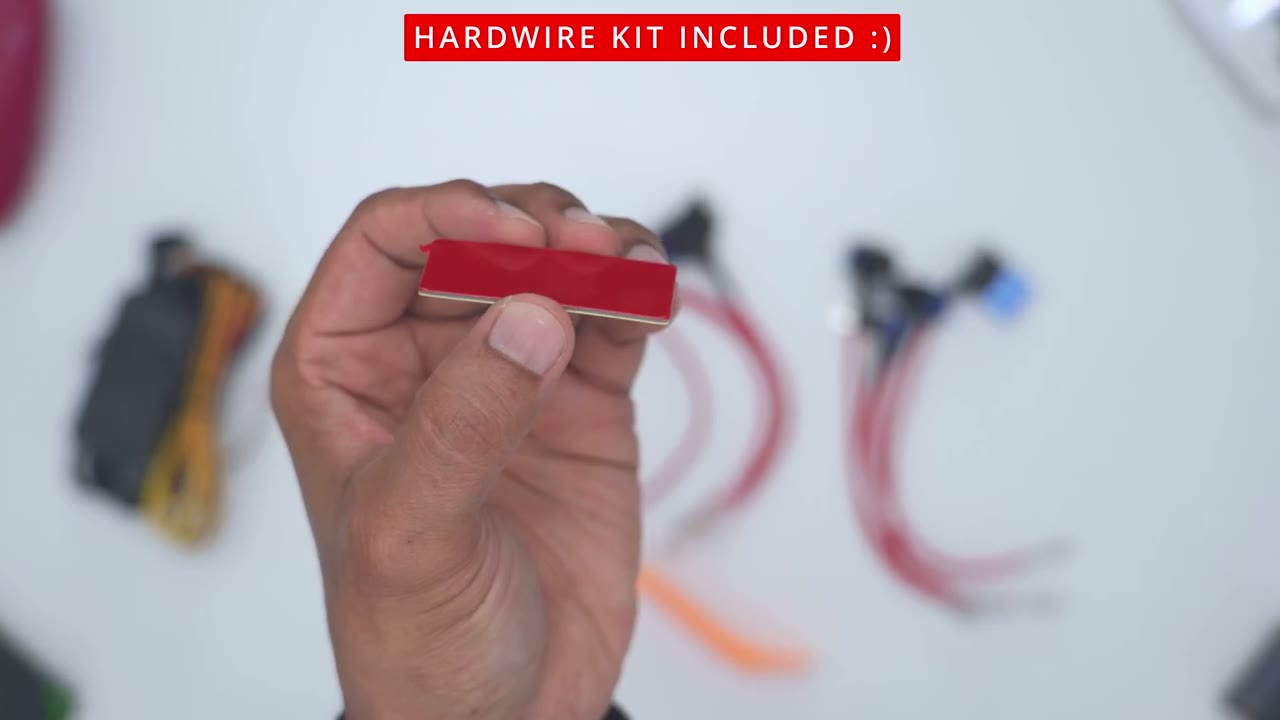
Now, under parking mode, this is only going to be available if you use the hardwire kit, which I am going to set up. Um, so I’ll I’ll talk about that later. GPS, you can have that data uh on or off. And that’s a signal right there. Date stamp, you can set the date and time. Now, speed stamp, you can have this overlaid on your video. I’ll leave it on for now. And then GPS stamp. I’m actually going to turn that off just for privacy reasons. Now, speed units, you could set it from kilometers to miles. Mine’s set to kilometers. And then I went through the various languages available. You can actually cycle through. And again, that’s a touch control. It’s actually fairly responsive. Now, you can also set the clock setting. Um, you know, year, month, date. You can set all of that.
Time style, uh, 24 hours or 12 hours. I’ll leave it at 12 hours. And let’s just take a look at what else. So, we can set time zones. daylight saving time. You could set the flicker here, 50 or 60 Hz. Um, there’s a format reminder, so you can format every 15 to 25 days. I’m going to leave that off. I like having my footage. And then you can just do manual formats of either the micro SD card or the um built-in storage if you need to. Now, card speed. I believe this is just going to check um Okay, it’s going to check the space. Um, okay. You can reset the entire dash camera settings. Um, app. This is to download the app. That’s already sorted. Now, product information. We could see the firmware version there. And then we have help center. So, that’s about it in terms of the settings.
Installation is
Installation
really simple. First, you’ll apply the electrostatic sticker to your windshield. Then, you can apply the dash cam mount. Do the same for the rear camera. Connect all the wiring and
Video Quality
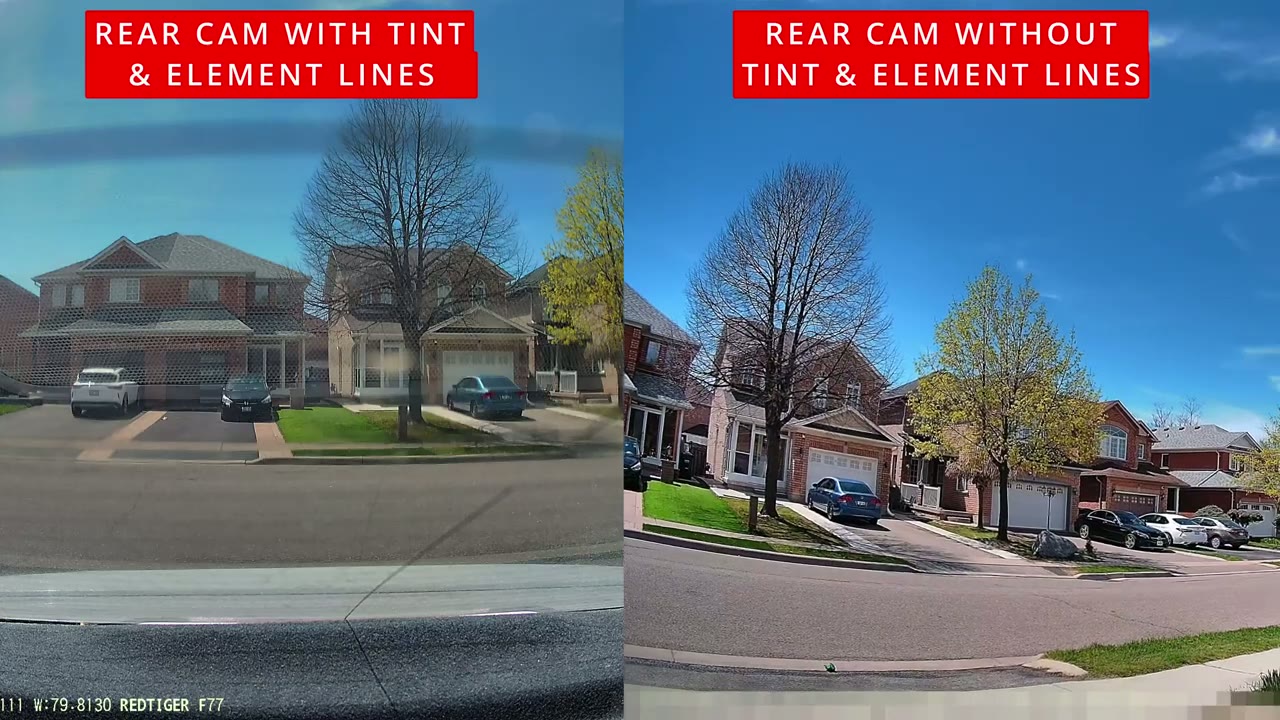
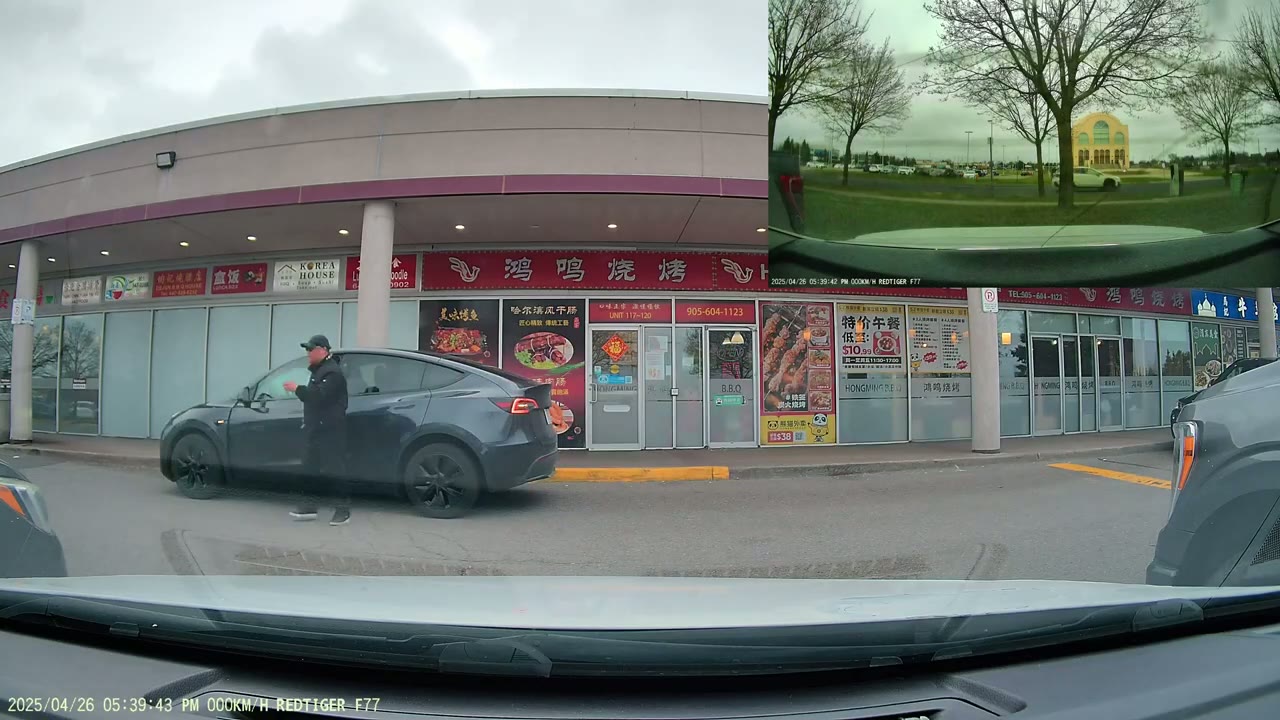
you’re done. The 4K video quality is detailed and impressive thanks to the Sony Starvis IMX 678 sensor and the high bit rate video. It was easy to make out license plates during the day or at night, whether it was bright, sunny, overcast, or raining. It did well in all of these scenarios, and that wide 170° field of view lets you see pretty much all the lanes around you, so there’s nothing that you’ll miss. The 4K video from the rear dash camera is also clear enough to make out plates easily. But note that because my glasses tinted and I have heating element lines to melt snow and ice because I’m in Canada, my video actually looks less clear than it would normally look. But you’ll have much clearer video than me if your rear glass isn’t tinted or has those heating
Timelapse Video
elements. The parking surveillance or time-lapse video is also very sharp, letting you see everything that transpired in or behind your car in 4K quality. Now, keep in mind you will have to use the hardwire kit that comes with the system if you want this 24/7 parking
Voice Commands
surveillance feature. The voice controls were fairly accurate, even with car cabin noise, and I rarely have to issue a command twice, but here’s a demo of that. Turn off screen, turn on screen, switch rear camera.
Storage
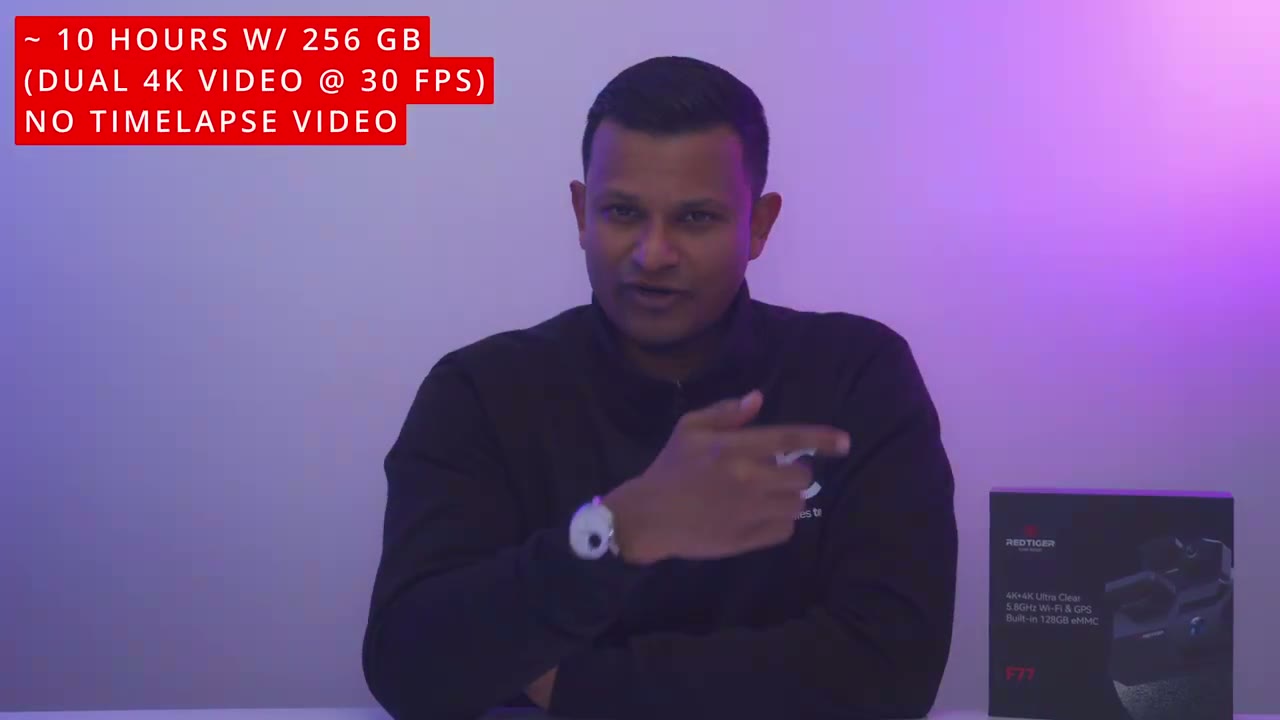
Now, with the 128 GB version, I have running both of the cameras front and rear at 4K recording at 30 frames per second, I’m going to get a little over 5 hours of continuous recording before the oldest clips are overwritten. So, if you want more than 5 hours, get the 256 GB version. That way, you’ll get like 10 hours of recordings before it’s
Minor Change
overwritten. I’ve loved using the F77 dash camera, but I see one small area for change, and that is that they’ve already given us the micro SD card slot. It would have been great if we could use that for roll over recordings. So maybe we could have inserted another 128 GB or a 256 or 512. And when the internal storage is filled, they could just roll over the recordings to the micro SD card. But not really a dealbreaker. So
Recommended?
if your current car’s dash camera only gives you front recordings and you’re not protected if someone say rear ends you, the Retiger F77 dual 4K dash camera is a fantastic option. The included storage means you don’t have to go out and pay extra for a micro SD card. And having that wide 170 degrees field of view, and the time-lapse video means you won’t miss much that goes on around your car. The voice control is also really convenient. And being able to see the rear dash camera on that large 4-in IPS touchscreen is great as well. So, I’ll leave links in the video description below and pin comments for you to pick up your very own Red Tiger F77 dual 4K dash camera or to learn more. And don’t forget to check out Red Tiger’s giveaway on their official social accounts.
They have blessing pouches up for grabs right now, so don’t miss out. And I’ll leave those link down below as well. And stay tuned because I will be reviewing their F17 Elite dash camera coming soon. But while you wait, maybe check out this video. I think you’re really going to like that as well. I have a huge favor to ask. If you found this video helpful, would you mind liking and subscribing? It truly does help me out quite a bit as a small and growing channel. And maybe consider checking out some of my other tech reviews. I review a bunch of different tech, whether it’s mechanical keyboards, headphones, earbuds, security cameras, dash cameras. Really something for everyone. And I hope to see you in my next video
Buy Redtiger F77 Dash Cam (4K+4K) on
Buy 512GB microSD Card on Amazon
Buy 256GB microSD Card on Amazon
Please note that some of the links in my video descriptions are affiliate links where I earn from qualifying purchases. As an Amazon Associate I earn from qualifying purchases.