


What is the point of creating a system restore point in Windows? Think about a system restore point as a snapshot or picture in time when your computer was working fine and without any issues. When you create a system restore point (snapshot of good computer health), you can always load that snapshot if things go wrong later, or if you are performing lots of driver updates or software updates. Depending on how much space you have set for the system restore point, the better the results you can expect when performing a system restore.
This how to guide will show you how to do the following things for your main system drive:
- Set the amount of space used for the system restore process
- Create a system restore point
- Restore to a certain point in time
This guide is based on using Windows 10, but it will also work for Windows 7. Let’s get into it.
Turn On System Restore & Set System Restore Space
Click on the Start Menu and type in “restore”, you will see “Create a restore point” come up in the results

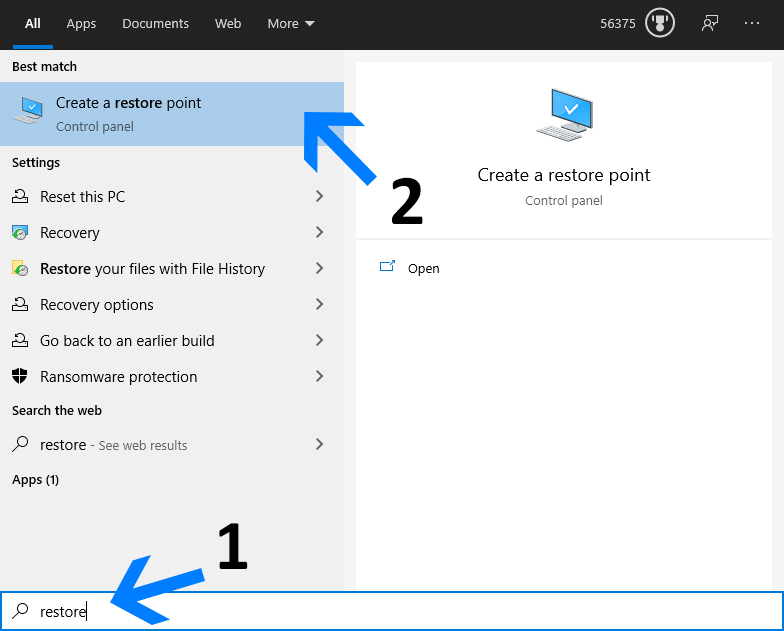
- Click on the “Create a restore point” result to be taken to System Restore setup window
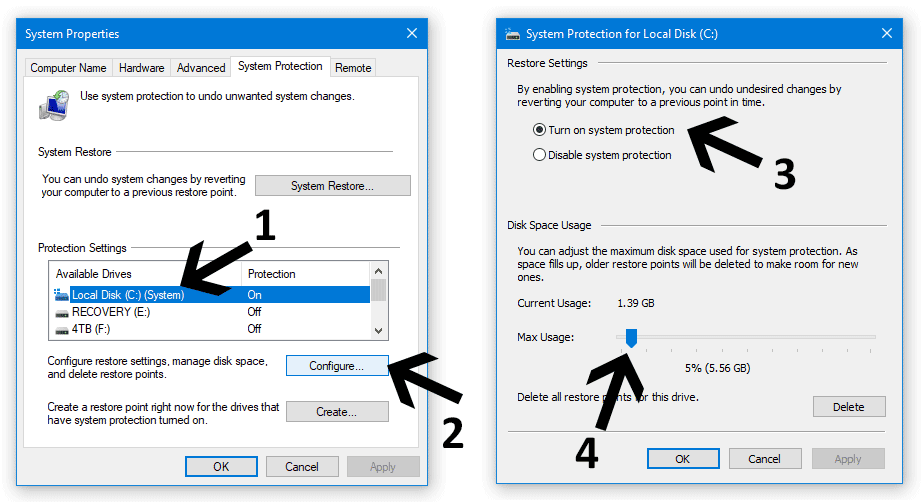
- On the system restore window, you will see a list of available drives, click on the drive with the word (System), then click on Configure. (We only want to configure the system drive where Windows lives)
- On the Configure window that pops up, ensure that the option “Turn on system protection” is enabled
- Next, at the bottom of the same window, there is a slider to assign how much hard drive space you want system restore to have access to. A setting of between 3% to 5% seems to work for most situations. Set the slider to a value you want and click OK to close the window and save the settings.

Create A System Restore Point In Windows 10
Now that we have confirmed that System restore / system protection is turned on, and we have set the amount of space that can be used for System restores, the next step is to actually create a system restore point. Follow these steps:
- If you closed the System Restore window already, repeat the start menu steps above to open it again
- Click on the drive that has the word “System” next to it since we only want to create a restore point for the Windows drive where all the important system files live.
- Then click on the Create button, which will bring up another window
- Enter a name for the system restore point, I recommend inputting the current date for easy troubleshooting reference, then click create.
- You will get a notification to show that the restore point was created successfully. Close the window.

Windows does create system restore points automatically, but it is still best to create system restore points manually when you anticipate potential issues. I always recommend creating a system restore point before you install new software or drivers. This is especially beneficial when they relate to a graphics card or editing Windows Registry values. Btw, Windows will also create a restore point before updating Windows through Windows Update.
Restoring or Using A Restore Point In Windows 10
If you restart or start up your computer after installing new software, updating device drivers or modifying registry entries and things are not working properly; you can try to troubleshoot the issues be reversing changes, rolling back drivers, etc. However, it is sometimes easier to perform a system restore and get back in business if you do not have time to troubleshoot. Here are the steps to use the system restore that you created earlier, or that Windows has automatically created.
- Click on the Start Menu again and type in “restore”, and click on “Create a restore point“
- Click on the System Restore button, then click Next on the window that pops up next
- On the following window, select the option “Show more restore points”
- Select the most relevant restore point (usually the most recent one at the top of the list), then click next
- Click Finish, and let the computer restart to apply the old snapshot changes.


Summing Up
By following these steps, you should be able to quickly restore your computer if anything goes wrong, providing that you have system restore enabled, and you have allocated enough space for it to save restore points. Again, I recommend allocating between 3% to 5% for system restore to use.
If I am making many updates to my computer, I will often perform one driver update, then restart my computer to ensure it is working properly. If it is, then I will create a restore point, then install a second driver, and perform the same system restore process until I have multiple system restore points based on each new driver or update I have made. This may be overkill for some people, but it helps with troubleshooting later.
I also find that updating sound and graphics card or video card drivers cause the most issues for people, so I recommend that you manually create a system restore point before updating drivers for these devices.
Keep in mind that sometimes when using Windows’ built-in Disk Cleanup tool, restore points can be deleted to free up space, so be mindful that you do not clear any if you use this tool and you also want to have restore points handy.
Let me know in the comments if these tips helped you, or if you ran into any issues with any of the steps in Windows 10 or Windows 7.