


Please note that some of the links in my video descriptions are affiliate links where I earn from qualifying purchases. As an Amazon Associate I earn from qualifying purchases.
Intro


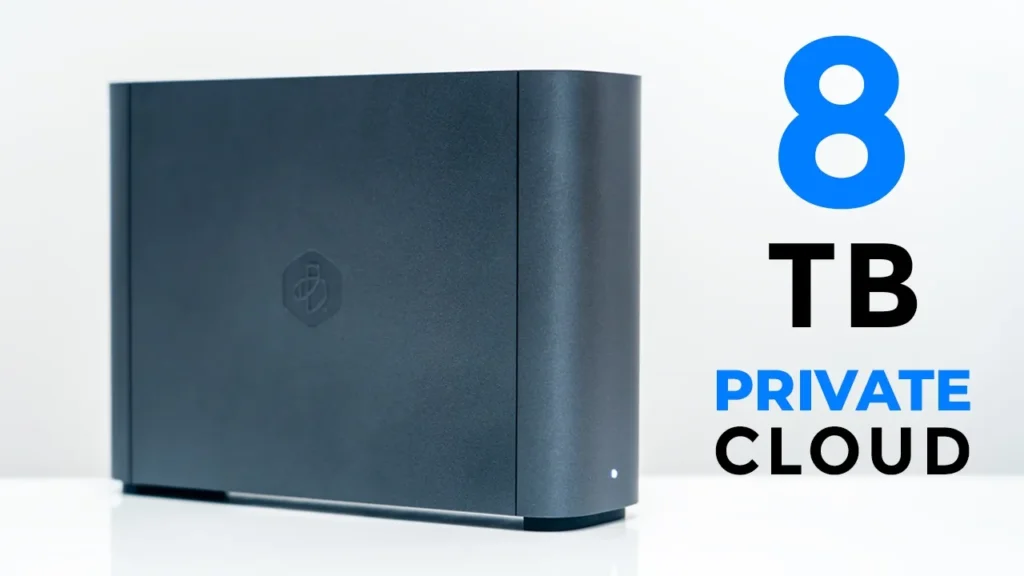
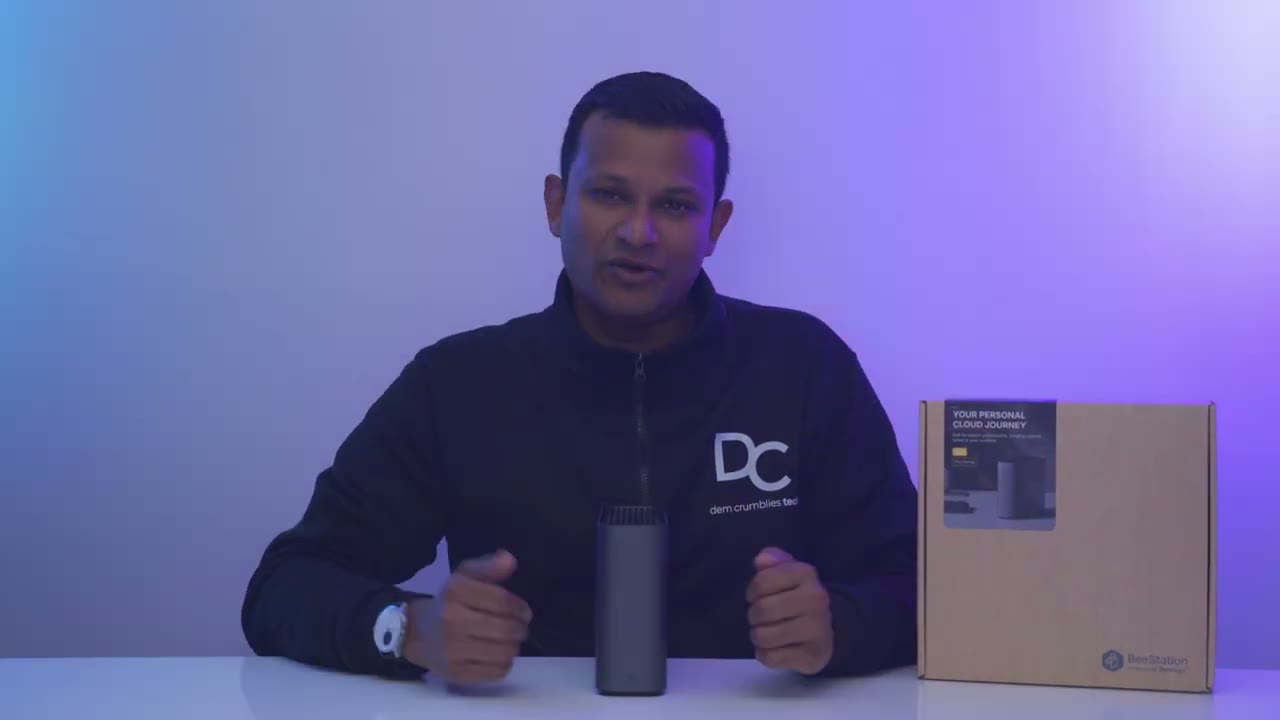
Hey, it’s Adrian. And if you want a bunch of reliable storage that you can access from your phone, from your PC, from anywhere in the world without having to pay for monthly cloud storage fees, you’re going to want to check out Synology’s new BStation Plus. It has a whopping 8 TB of storage. Plex media support so you can watch all of your media anywhere you like. 4 gigs of RAM allow for easy multitasking, so you could sync files, share files, categorize images, and more. It has file recovery. If you accidentally delete files, you can add up to an additional eight more users to share this space. You have local USB backup and optional cloud backup as well. So, let’s take a closer look at Synologyy’s new BS Station Plus to see if this could be the perfect private cloud storage for you.
And a big thanks to Sonology for sending
Package Contents
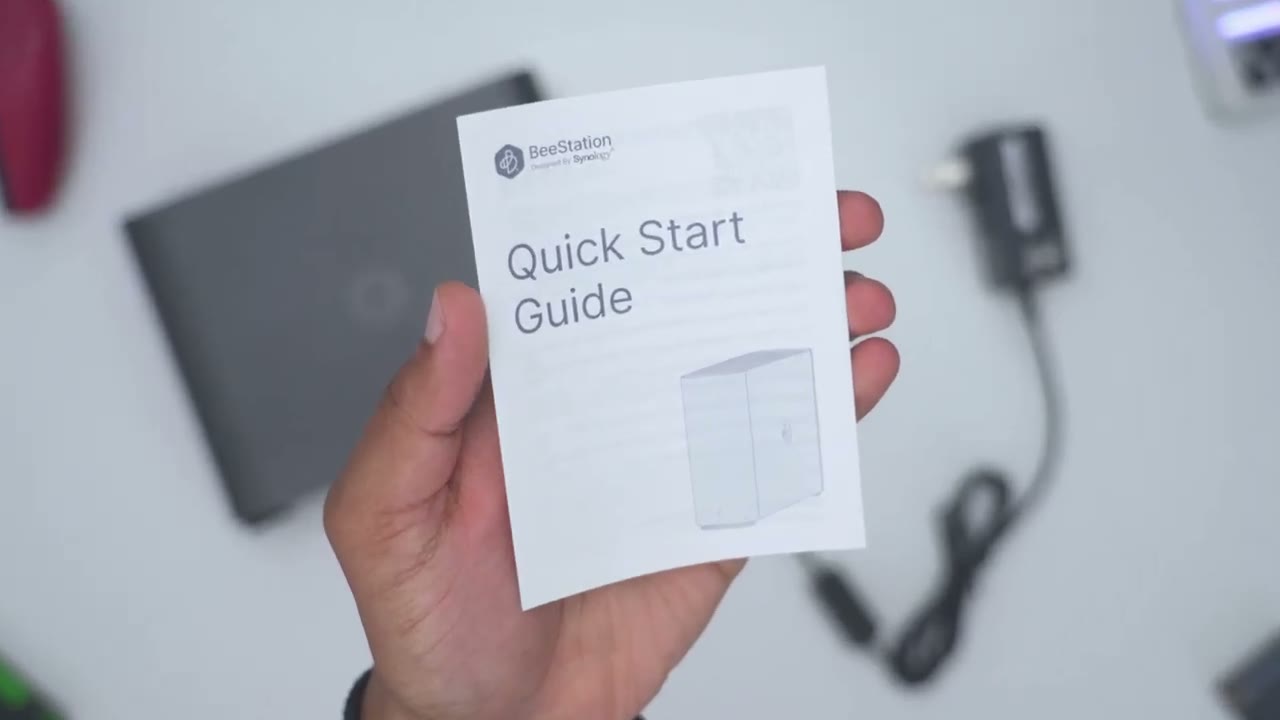
this out for review. In the box, we have the brand new Synology BStation Plus with an 8 TBTE capacity Ethernet cable. We also have a power adapter with a detachable connector end and a quick start guide.
Design
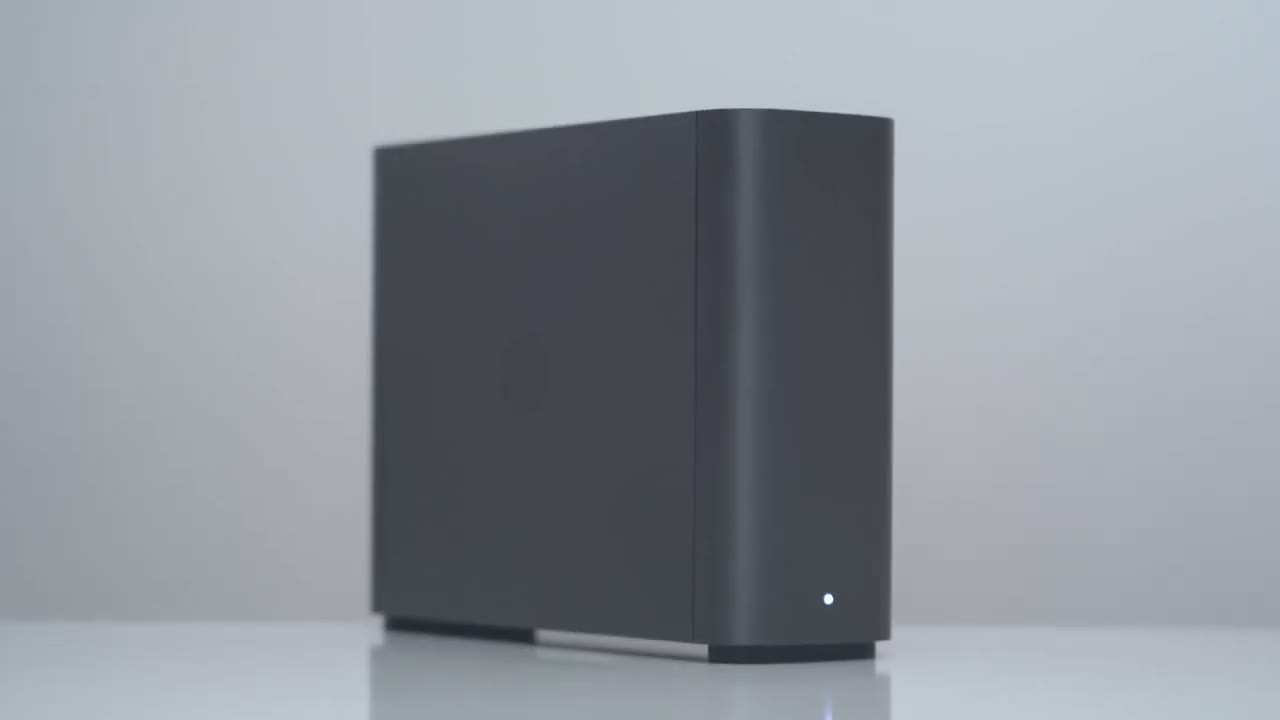
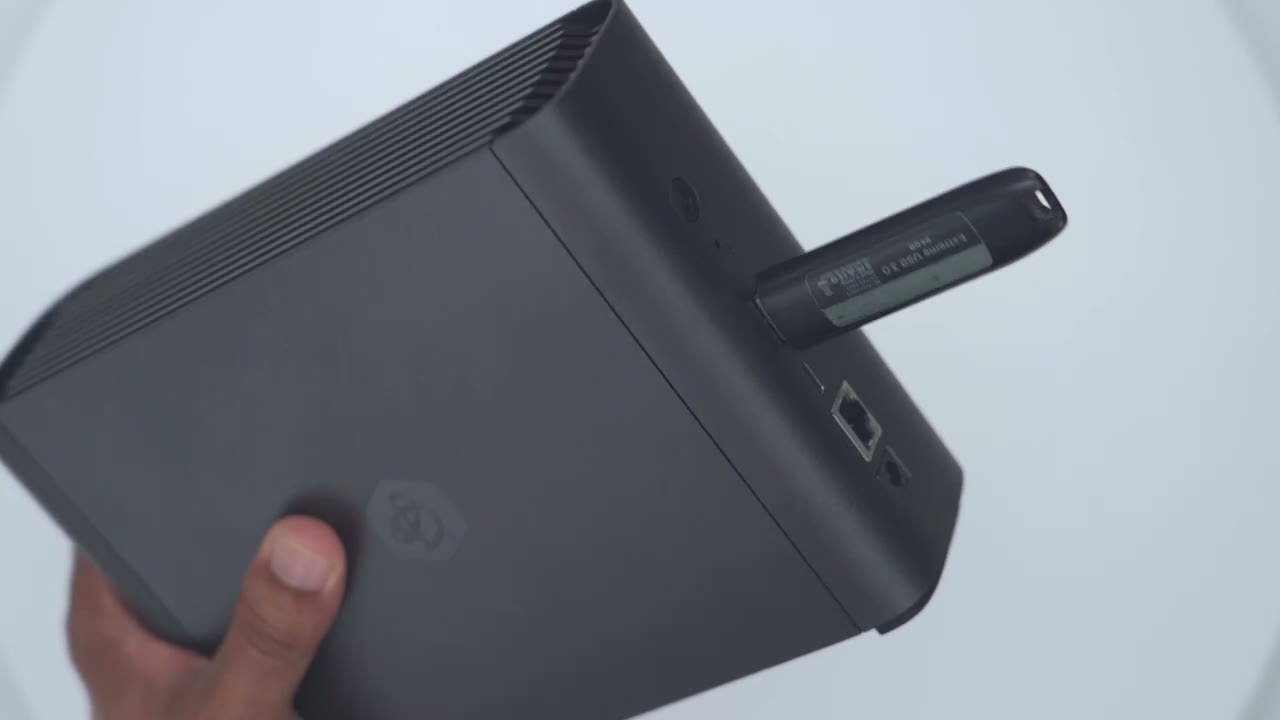
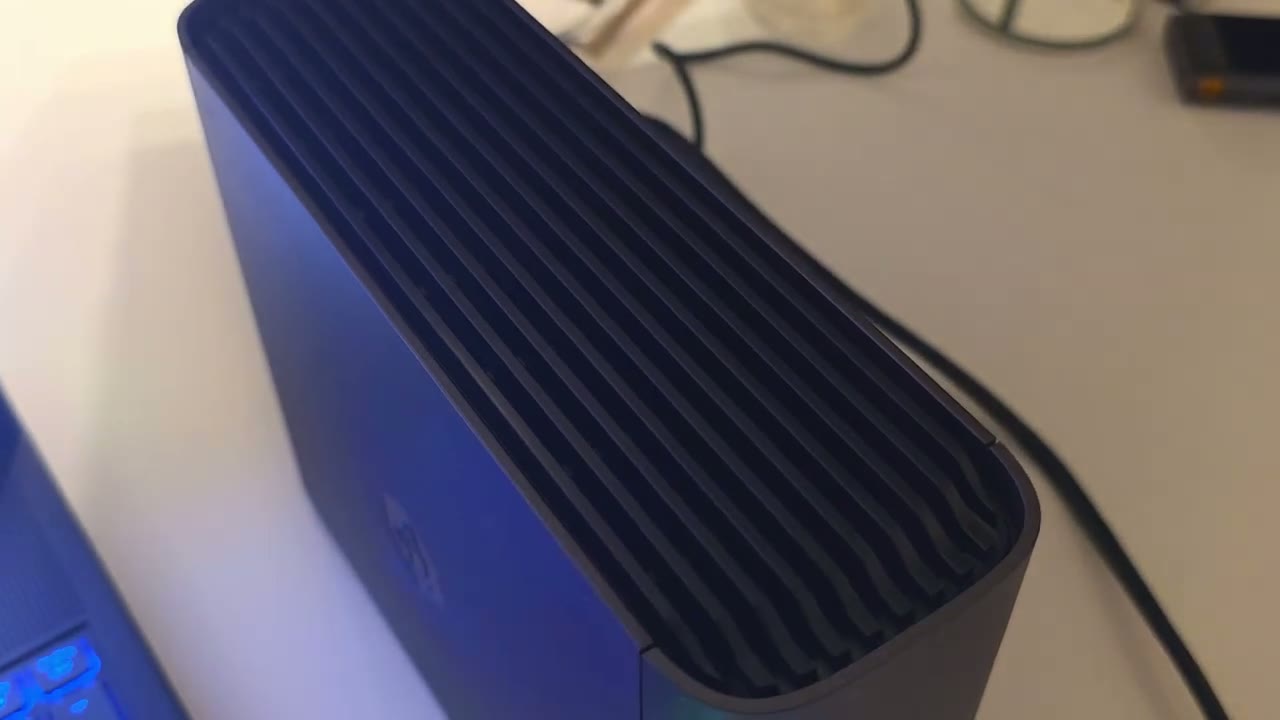
So, the design of the new BStation Plus should fit really nicely on any desk. So, we do have the BS Station logo on the right and left side, and we have this kind of matte plasticky finish all the way through, which is semi-resistant to fingerprints. On the front, we have an LED indicator light. At the very bottom, we just have ventilation along with a serial number. And then at the very top, there’s additional ventilation as well. You can see that there is some fan blades there to help keep this cool. And then on the very rear, we have the power button, a reset port, USB typeA 3.2 Gen1 port, and a USB type-C 3.2 Gen1 port as well, Ethernet port, and then the power adapter port. There’s also rubber feet at the very bottom to help keep this nice and planted.
And this comes in at around 2.6 lb or 1.1 kg.
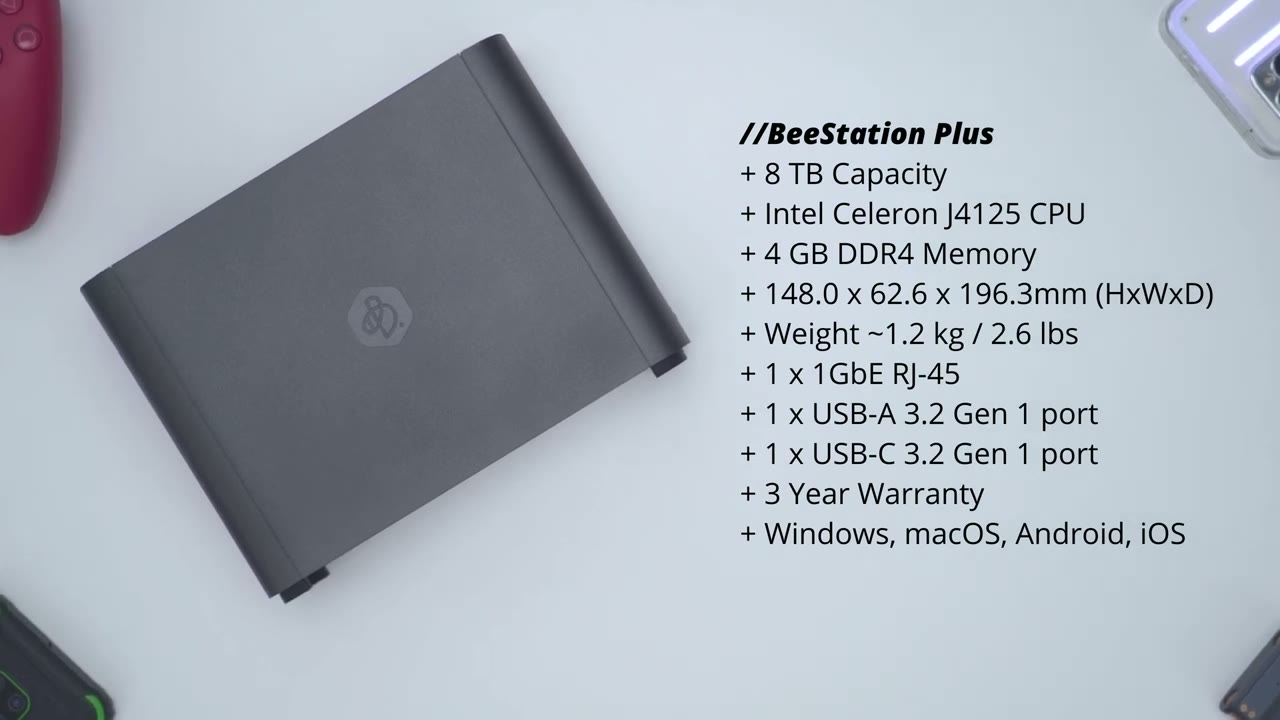
Specs
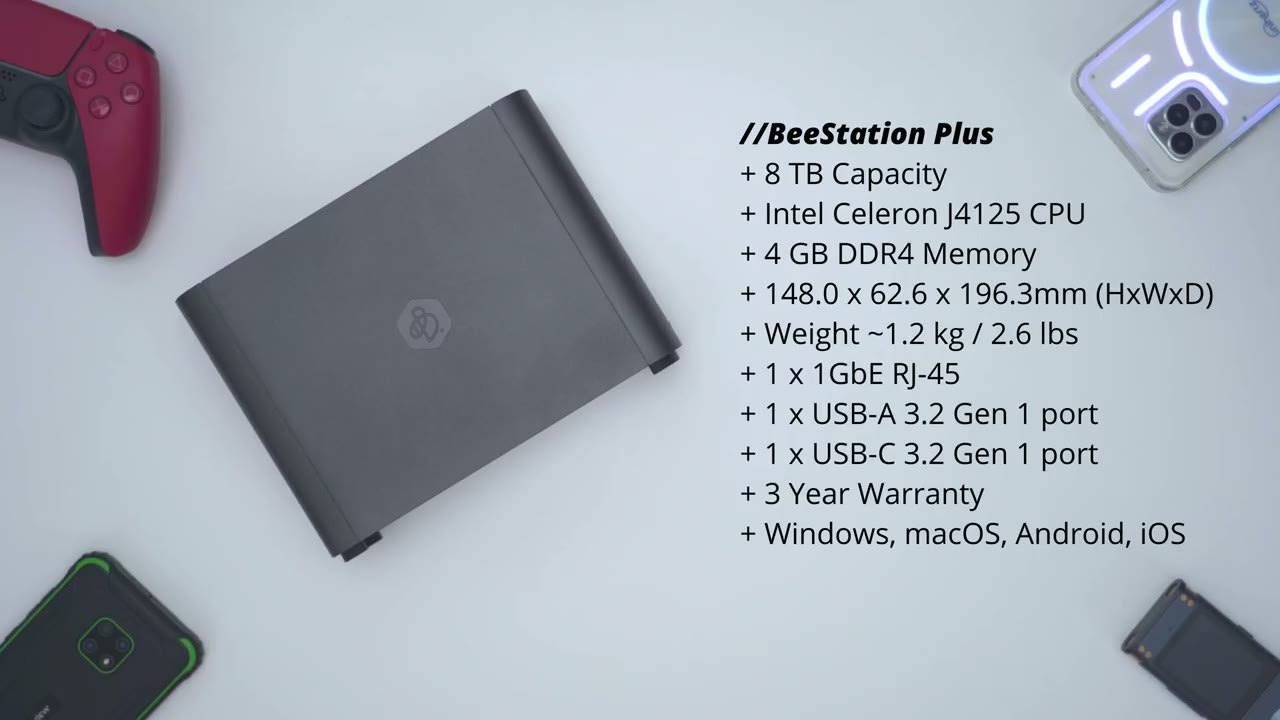
Here’s a quick look at the specs. Feel free to pause and review or jump ahead to the next section. Setup is extremely
Setup
easy. You’re just going to plug this into the wall and then plug it into your modem or router. Once you do that, you’re going to go to portal.b.ssonology.com. In your desktop browser, you’re just going to create a Synology account if you don’t have one. Once you initially set the Bstation Plus up, you’re going to be presented with two options, which are B files and B photos. Now, BOS is pretty
BeePhotos
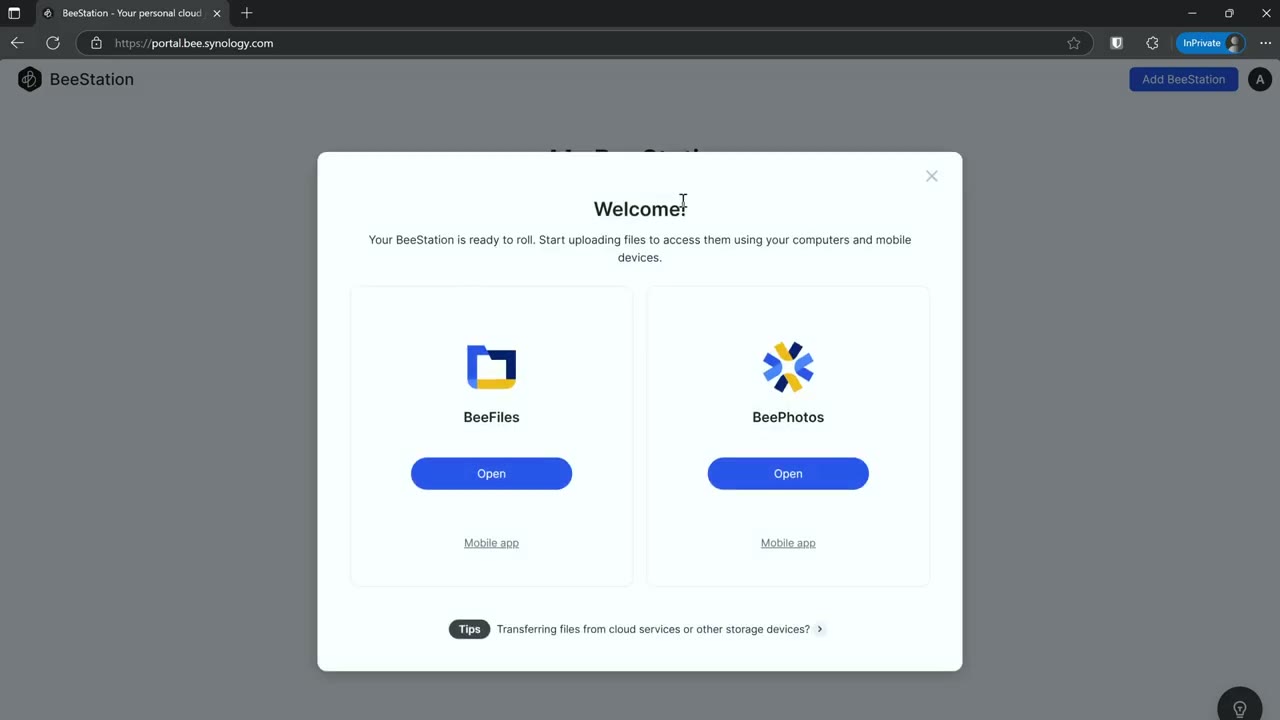
self-explanatory. That’s just going to sync photos from your computer or from your phone if you get the phone app or mobile app. And of course, you can specify which folders you would like. However, there is one other unique benefit of using B photos and that is that it has this type of AI categorization of the images. So, you can create a folder assigned specific conditions like I’ve made one for people, one for objects, one for things, one for text, and any images that match that for the most part it will categorize that into those folders.
And if you’re like me and you take a ton of video and photos on your phone and you’re always running out of cloud storage space, whether that’s, you know, a Google drive, one drive, etc., you can just have it automatically sync to the BS station plus so that you know if your phone gets damaged, lost, you never have to worry about that. And the B files app
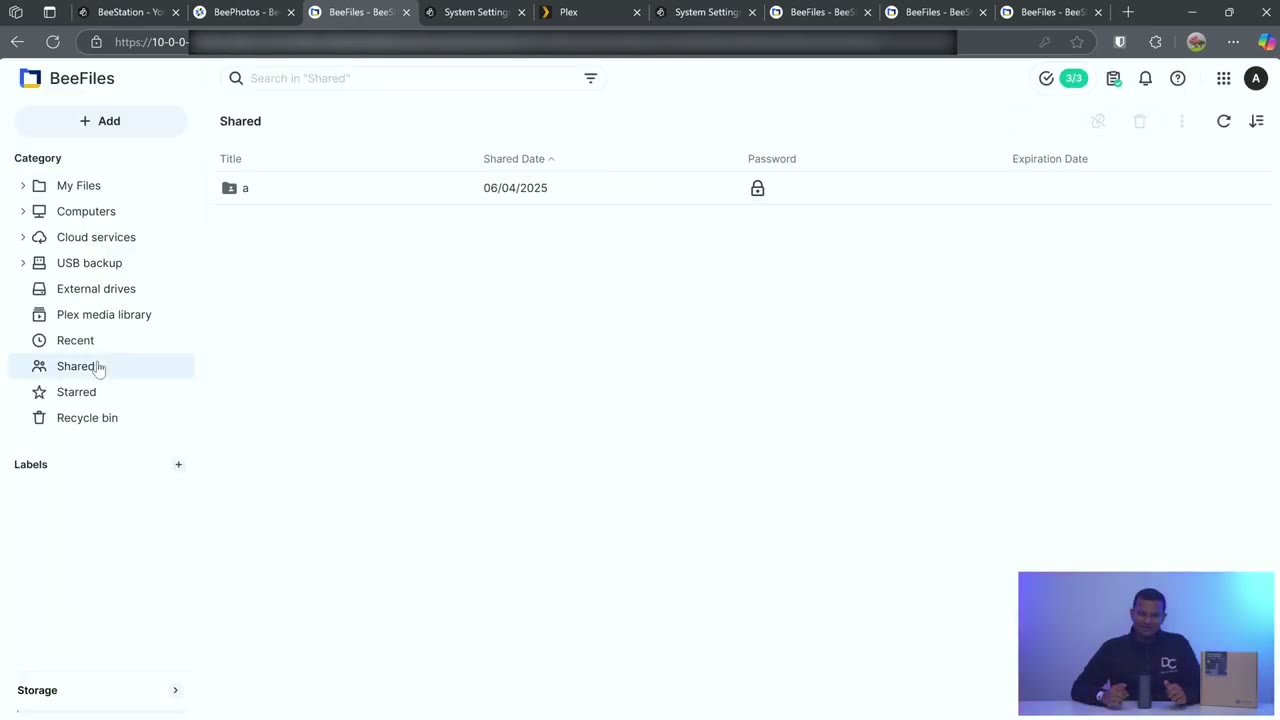
BeeFiles
is where I’m going to be spending most of my time. So once you go into that, you can actually set up a B folder on the Bstation Plus and then you could drag in any type of files that you would like synced. And of course basically from any device whether it’s a phone you know a desktop laptop whatever you can easily access that file or that folder and anything in there you can also share that you can set a uh password to share that or you could set a time expiry. So it’s just really easy to share you know among users or with anyone who has the
BeePhotos Settings
link. Let’s take a look at the BS station plus settings. So once you plug everything in you’re going to go to this website portal.b.synology.com and you’ll be presented with a dashboard like this. So, it says B files, B photos. I can see that it’s online and I can see that it’s just kind of waiting to perform a backup. And I can see the system settings here, but I’ll jump into B photos first. And you’ll see it’s automatically going to just show all of the images it’s pulled from my phone because I do have the B photos app installed on there. And then whatever I’ve dragged in either on the local folder uh on the BS Plus or whatever I’ve manually chosen to sync from my desktop or laptop. Now, you can also click on quick filter and kind of filter this down if you want to find images quicker.
You can also go into albums and you can see it’s created some like recently added people, subjects, places, etc. Now, if I go into subjects, for example, and I go into uh cats, I can just right click on any one of these and then go to share. And notice I can go ahead and set, you know, kind of to require a password or to expire on a certain date. So if I just said, hey, expire on this time here. Now I’ll just jump back into sharing and I can see that that uh photo is being shared. You can also uh request photos. So you can kind of create a request, invite people to submit photos. Then we could go under recycle bin and because it has this kind of file retention history, you could see um this is a file I deleted.
I could just rightclick and click on restore to restore that from wherever I deleted it. and it says files will deleted after 30 days. And that’s something I’ve set. The default is 14. You can set it from 3 to 30 days. But now, let’s jump into the B
BeeFiles Settings

files since that’s where a lot of you are going to be spending your time. So, I’ll wait for that to load up. And notice it’s all via web interface and it loads up fairly quickly. So, at a glance, I can see, you know, I have this folder I created here, um, a and then I have another folder here for a keyboard. And then at the very bottom left, it shows the storage. So 830 gigs used of the uh 6.97 TB I believe of usable space. If I um click into storage here, I can see kind of a breakdown. So I can see the storage used on the right side and you know the location. And what’s really handy is on the left side here, it kind of breaks down exactly where files are distributed or you can you know uh use this kind of horizontal um thing at the top here. But let’s just expand my files.
I’ll break that down. So A is where I’ve created that kind of folder where I could just kind of drag anything that I want. Now I can also go into computers and you could see that I have this Legion 9i um which is this laptop now and if I expand that uh I have a folder here with you know various files. Now I can also go to Legion G8 which is my desktop and I’m sharing or syncing one entire drive on that computer. So you can share you know or sync sorry drives or you know specific folders or just you know individual files. A lot of functionality there. Then if we go into cloud services I’ve uh synced my Google drive here specifically one folder on my Google drive instead of the entire thing. And then you can also tap on here add new connection and these are the available options.
You have Dropbox you know one drive etc. And then under USB backup, this is where you could plug in um you know some kind of uh external drive, external USB drive and back up everything on your BS station plus to that so you can just house it somewhere offsite in case you know in case there’s a theft, fire, floods, etc. And then we can go into external drives. Now, because this does have a USB type A and type-C slot at the back, you can actually plug things into that and then back up like the contents on there or you could just browse whatever is there. And then under Plex media library, again, you could drag stuff into here. So, I believe if I go under other videos, no, maybe uh let’s go back here under movies. Yeah. So, I have a bunch of stuff kind of loaded in there.
And then, of course, you could go under recent to take a look at recent files. you can take a look at everything that’s shared. All right, let’s jump into the full system settings. Now, give that a second to load. And you can see right now the total is 6.98 TB and I’ve already used about 10% of that. It also shows a breakdown. So, this is me. This is that other user that joined. This is what’s allocated for in uh internal restore points, the Plex library, and then reserve for system use. Now, under users, this is where you can add additional users. So, you’re there by default. you could add eight more users. So for a total of nine. Now one thing I did note is if you click on invite user um there’s actually no way to set how much um storage quota you want per user.
So I guess you know if one user was kind of a storage hog that could be problematic. Hopefully that’s something you know you can add later on with another update. And then if we jump into settings we just see basic uh system information here. If you need it you could set time zones etc. under data protection. This is where you can go ahead and set up that uh cloud trial plan. So you can see mine is set up. It’s going to start the backup um at this time every day. And then in internal restore points is what I mentioned. So you have some protection if files are accidentally deleted. I’ve set it to 30 days. If I click into that, the default is 14 or you can set it as low as 3 days, you know, space permitting.
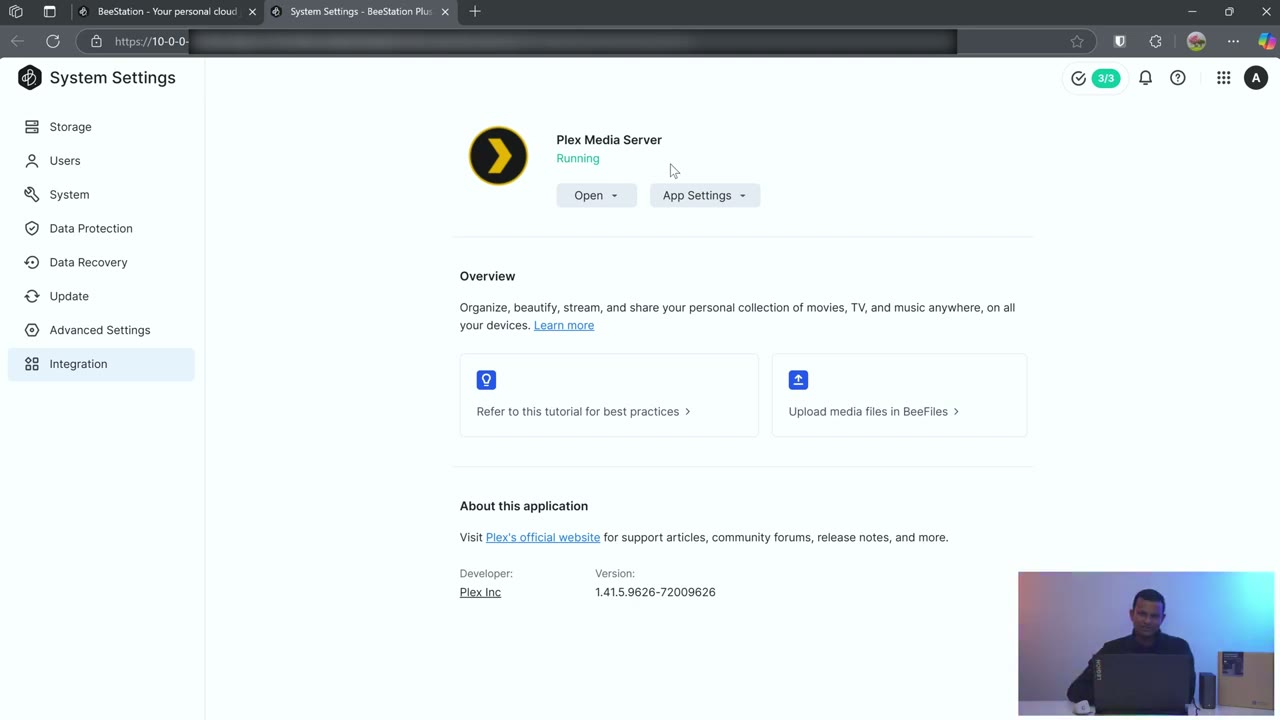
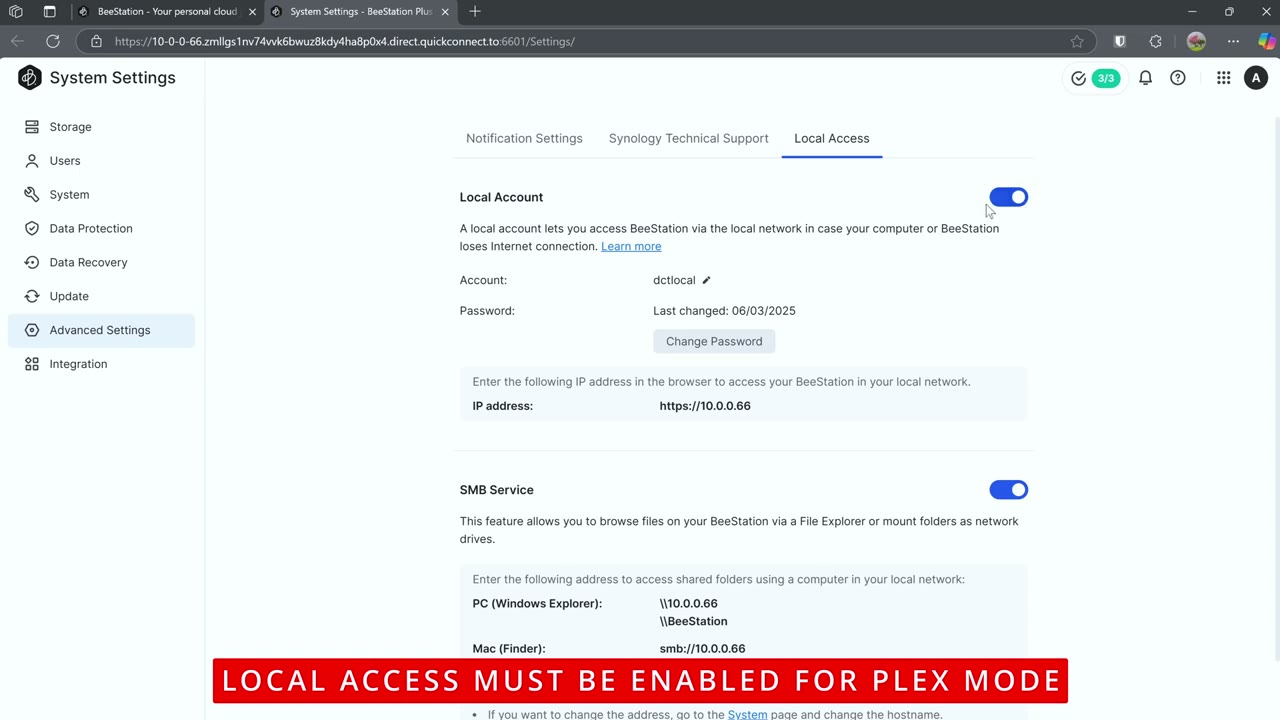
Under data recovery, it shows you can retrieve specific files if you accidentally delete them. If we click on update, you can just perform updates here. And mine is on the most recent version. And then under advanced settings, you can enable, you know, email notifications if this has shut down improperly or there’s anything abnormal, it’ll email you. And then you can just um go to technical support if you’re having issues and then enable remote access. And then local access is where you’re going to want to go if you’re going to use Plex functionality or you want to be able to access files from any of your network computers. So you can see here I’ve enabled it.
You turn on this uh slider here, create an account name, set a password, and then every computer on the network with those same credentials can access files on the BS station plus. And then you can turn on the SMD service as well. And it shows you how to access everything. And then you could just mount uh network folders, drives, etc. And under integration, this is where you would go to set up Plex functionality. And again, if you don’t see this option or if you’re not able to set it up, make sure you enable that local access first. So that’s about it
BeeStation Software
for the settings. Now, you could see on my actual laptop, there is this folder called Bstation, and you could just drag any files into this one folder, and that’s going to be automatically synced and, you know, accessible from all of your devices or if you want to share those. Now, one thing to note with this is you can see if I go into my D drive here, notice that the 2025 folder has this kind of a black icon here, and that tells me that this is manually set to sync to the BS Station Plus. So, I’ve designated this folder of all the folders on my laptop to continuously sync with the BS Station Plus. So, at a glance, you can see which folders are being synced. I’m just going to run through the desktop software really quickly, so you can see everything is up to date right now.
And this is the path it’s created for me to just drag files and other folders in to be synced on the Vstation Plus. If I tap on my computer, you can see this 2025. This is a folder I specifically selected, the one with the little icon there, but you can go ahead select other folders either for files or for photos. And then we can also take a look at a log to see, you know, everything that’s been transferred or not. We can take a look at the photo log transfer. And if we go into settings, we just have, you know, general settings, you know, start with Windows, where to prioritize, you know, which file is newest and things like
Local Access

that. If you enable the local network sharing option and you create that local account, any computers on the network can access any of the files provided they have the same user account and credentials. And this is good because if the internet ever goes down, you still have local access across all of your computers on your home or office
Plex Mode
network. Plex mode also works flawlessly on the BS station plus. Now, to set this up, you’re going to go into the system settings, integrations, and then you’re going to enable Plex mode. Now, do note you’re going to have to turn on the local network sharing option to do that.
Backup Options
So, there’s three backup options. So, they have their Synology C2 storage. So, this comes with a 3month um trial cloud storage plan. It’s just going to upload everything there. And I believe after the 3 months, it’s around $120 US um for a year. Now, the other option is just to back this up to your Synology NAS if you have one of those. And if not, then you also have an option to plug in like a local USB drive. We do have a type A and type-C port uh 3.2 Gen 1. And if you
Mobile Apps
want to access files from your phone or to sync files from your phone to the B station plus there’s two separate apps, so you can either download the B files or B photos or both apps like I did on my phone, it’s just going to continuously sync whatever you have on your phone. And then you can also access files and administer the BS station plus
Noise Level

directly from your phone.
BeeStation Vs BeeStation Plus
Now, how does the BS Station Plus compare to the previous model, which is the BS Station that came with a 4 TB drive? Well, I’ve not personally used the previous generation, but you know, you’re getting double the storage since this is an 8 TB drive. The previous model also had 1 gig of RAM. This has 4 gigs of RAM, so it’s way better for multitasking. And this also has Plex support, which the other previous model did not have. So, for some of you, this may already be worth the upgrade. So,
Recommened?
can I recommend the brand new Synology BS Station Plus? And it’s an easy recommendation for me because previously I was just using, you know, internal drives for all of my storage, which was pretty limiting. But with the BStation Plus, not only do I have all of my important files saved, I also have file retention history. I have flawless Plex support on here. I have the ability to add additional users on here. I could share files with them remotely anywhere in the world, locally on my network. also have the ability to sync files and photos from my phone effortlessly. So, if you’re paying for a monthly cloud plan and you’re not getting close to the 8 terabytes that you’re going to get on here, this offers a lot of those features. You know, you have the automatic file syncing.
You have the ability to share remotely locally. You have Plex support. You can access this from your phone, from your PC. This just does it all. So, if you’re interested in picking up your very own Bestation Plus, I’m going to leave links down below. And stay tuned for more videos like this. I’ll likely be reviewing Sony’s new DS925 Plus for those of you who need a little bit more pro features and way more storage. And if I can ask a huge favor, would you mind liking and subscribing if you found this video helpful? It really does help me out quite a bit. And maybe consider checking out some of my other tech reviews. I review a bunch of different things, not just these type of drives. And I really hope you’ll join me in my next video
Please note that some of the links in my video descriptions are affiliate links where I earn from qualifying purchases. As an Amazon Associate I earn from qualifying purchases.