


If you cannot upgrade your hard drive to a larger storage or capacity drive or add an external drive, freeing up space on your existing Drive is the next best option. I’m going to go over three options to help you free up space on your hard drive from unwanted files.
Please note that you should back up all critical files before trying any of these steps. Be sure to back up critical documents, photos, songs, videos, etc. before attempting any of these steps. You can backup critical files on an external USB drive to Google Drive, One Drive, or any service that you have access to.
Also, be sure to create a System Restore Point before making any changes to have a backup just in case.
Option 1 – Use Windows’ Built-In Disk Cleanup
Using Windows’ built-in disk cleanup tool is a pretty safe option because Windows has a good idea of what is safe to delete.
A word of caution, be sure to double-check your recycle bin before doing this step in case you want to restore any files deleted by mistake. You may want to roll back or revert to an older version of Windows 10 if a recent update is causing software or driver issues. Do not select the option below to delete “Temporary Windows Installation Files” or any associated log files unless you are confident that your system is stable and running fine. You are usually safe to delete all of these files after a month of stable operation.
Follow these tips to get started:

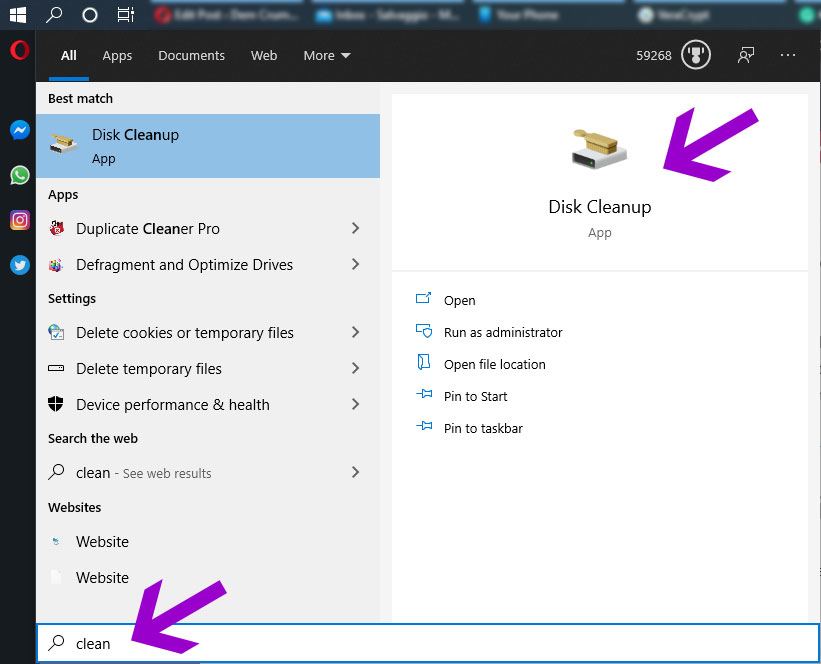
- Click on the start menu, and type the word “clean.”
- Click on the Disk Cleanup app that shows up in the search results
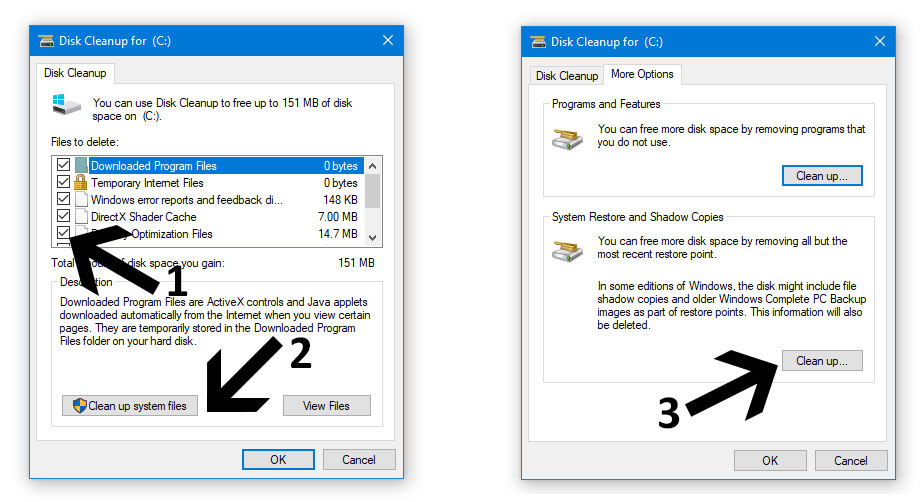
- At the pop-up prompt window, select the (C:) drive, and press OK
- Select all of the text boxes presented to you in the first window, scroll down to see them all
- Next, click on the button that reads “Clean up system files” at the bottom left, and select (C:) drive
- You will now see a new option for “Temporary Windows Installation Files”, select this checkbox
- Next click on the tab that reads “More Options” at the top of the window
- Click on the second “Clean Up” button under System Restore & Shadow Copies
- A prompt will come up asking you to confirm your decision, click “Delete,” and you are done.

Delete system restore points, adjust space for sys restore, reduce recycle bin size, temp files
Option 2 – Adjust Space Allocated For System Restore
Another option to reclaim some space on your computer is to reduce the amount of space that your computer can use for System Restore functionality. This is not a light decision to make if you frequently experience computer instability issues. If you often experience computer issues, you do not want to reduce the space that Windows uses to help restore your computer. However, if your computer runs smoothly most of the time with little hiccups, then you can reduce the space needed for this feature.
Here are the steps to adjust the space used for system restore:

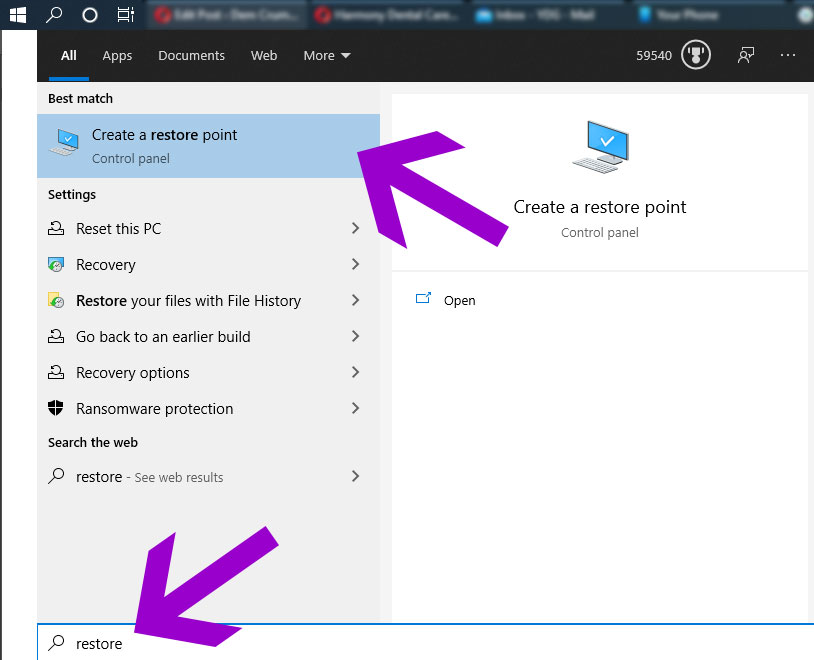
- Click on the start menu, and type the word “restore.”
- Click on the Create a restore point app shows up in the search results
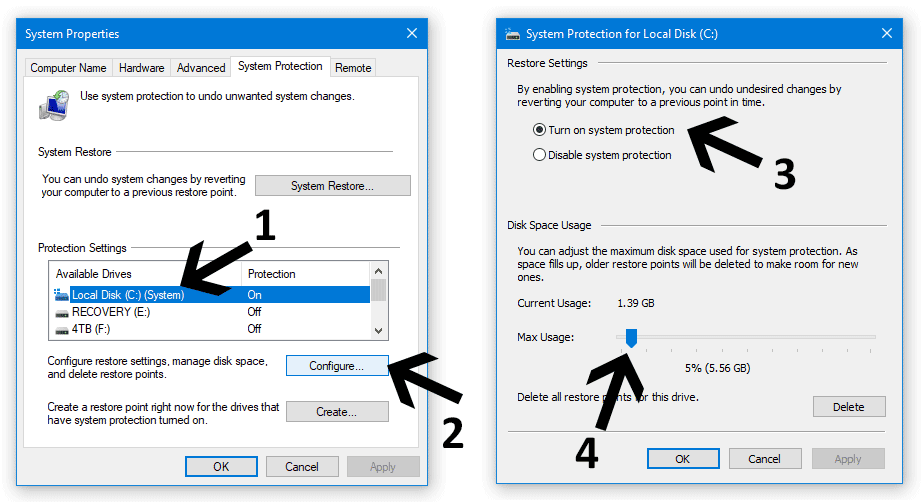
- On the window that opens up, look at the column that says “Protection”
- Click on the local system drive that has protection turned on (usually C: Drive)
- Then click on the Configure button
- On the next window that opens up, you will see a slider at the bottom of the window
- Move the slider until you reach the desired percentage or amount of GB (gigabytes)
- On my system, it is set to 5%, but it can be set lower if your computer is pretty stable.
Option 3 – Reduce Recycle Bin Space

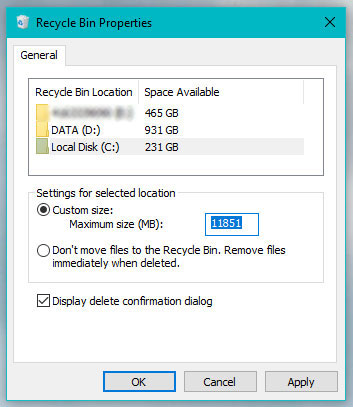
Another quick way to reclaim some space in Windows is to reduce the amount of available space reserved for the Recycle bin. Follow these steps to do this:
- Find and right click on the Recycle bin icon, then select properties
- Click on Local Disk (C:), and ensure that the option “Custom Size” is selected
- Enter in a lower amount, such as 1024 or 2056 MB instead of the default value
Option 4 – Remove AppData Files Manually (Advanced)
If you’ve used the first two options, but still find yourself wanting to regain more space, the next option is to begin deleting unwanted AppData files. This needs to be done manually and can result in system instability or specific programs no longer working properly if done improperly. Be sure to make backups of your critical files before attempting this method.
Again, before you start on this method, be sure to back up any critical files in case of a system issue.
By default, Windows hides the AppData folder precisely to avoid users from accessing it and deleting things that should not be touched. Before we get started, we have to unhide this folder. Follow these steps to do that:
Unhide Hidden Windows Folders
- Click on the Start Menu and type in “File Explorer Options” and click on File Explorer Options
- Click the View tab, scroll to Hidden files & folders, then select “Show hidden files, folders & drives”

Navigate To The AppData Folder
- Click on the Start Menu, type in PC, then select This PC
- Double click the (C:) drive
- Double click the Users folder
- Double click your Windows Username
- Double click the AppData folder
- Double click the Local Folder
- Sort the folders by the Date Modified field / column
- You can delete any program folders that were not removed when you uninstalled the program previously
You can also delete temp or cache files in specific app folders safely most of the time, but I recommend that you just move these files to another location first, start up the program, and if everything runs normally, then you can safely delete the temp files permanently.
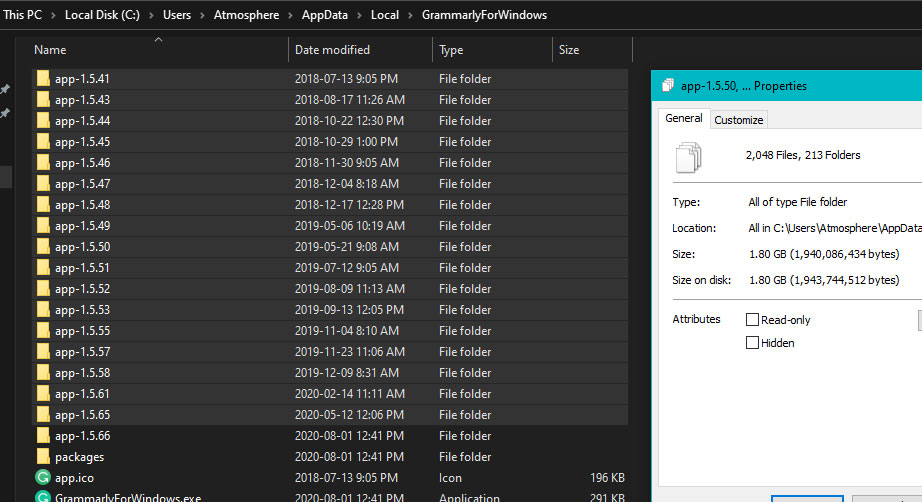
For example, I use the program Grammarly which has pretty frequent updates. However, I noticed that the program keeps many older package files. I sort the files by Date Modified, then I delete all the older files, leaving only the newest file. Then I open up Grammarly and verify that the program does not crash and that all of my saved files are present before I permanently delete the older files from the Recycle bin.
As you can see below, doing this saved me approximately 2.5 GB from just one software folder. Every folder will not yield the same results, but you may have software that leaves behind very old files that are no longer needed.
** Avoid touching the Roaming Folder or any Windows or Microsoft Folders **

Summing Up
I hope these tips helped you to reclaim some additional storage or space on your Windows 10 computer. Remember to create system restore points and to make a backup of your important files before you start this step.
Leave a comment below if this helped you, if you had any issues with following the steps, or if you have found another way or a better way to save space in Windows 10. Good luck.