Buy Reolink Duo 3 POE Camera on Reolink
Buy Reolink Duo 3 PoE Camera on
Buy Reolink Duo 3 PoE Camera on Amazon Worldwide
Buy Reolink Duo 2 POE Camera on Amazon
Buy Reolink Duo 2 Wifi Camera on Amazon
Please note that some of the links in my video descriptions are affiliate links where I earn from qualifying purchases. As an Amazon Associate I earn from qualifying purchases.
Intro
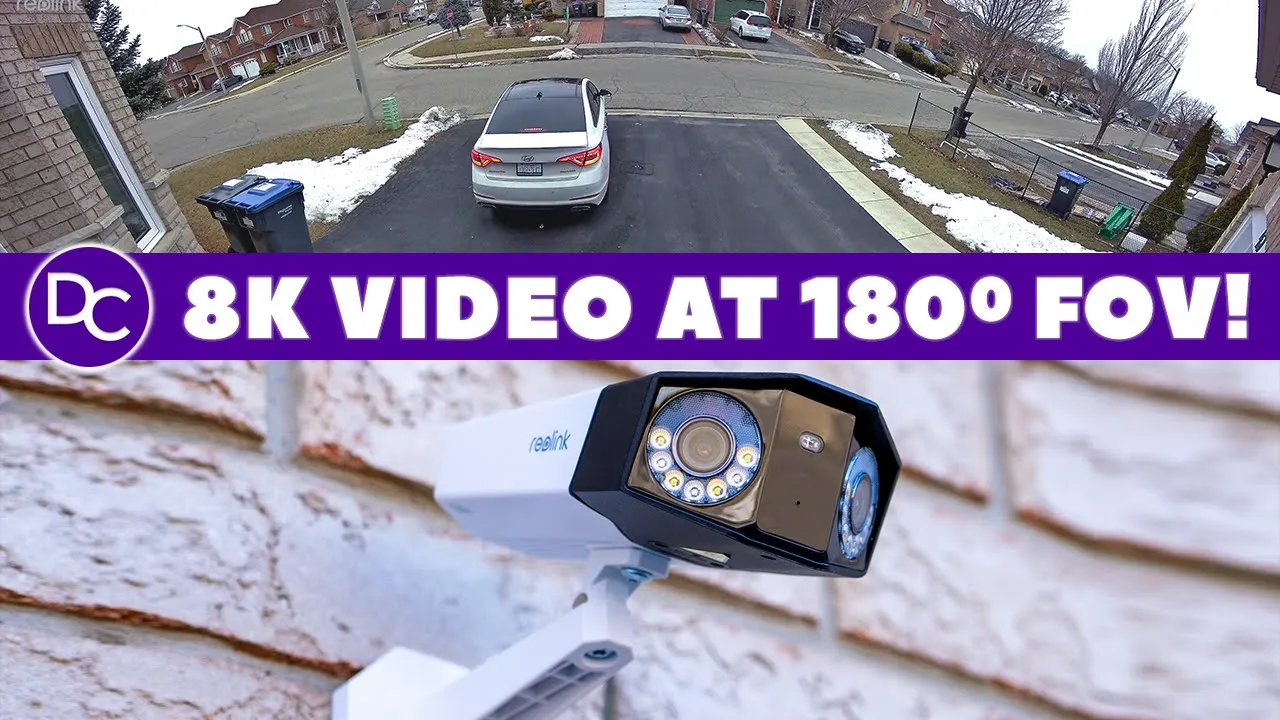
hey guys it’s Adrian and today I have something super exciting I have real Ling’s brand new du 3 Poe camera I really love the duo2 thanks to the 180° field of view 24/7 recording and all in 4k quality so when rolink contacted me to review the DU 3 I was super excited and the reason is is because we’re still getting that impressive 180° field of view that we’re used to 24/7 recording of course but we now have 16 megapixels resulting in 8k video so let’s take a closer look at the realink duo3 poe camera to see if it’s worth the upgrade from the du2 and a big thanks to realink for sending this out for review in the
Package Contents
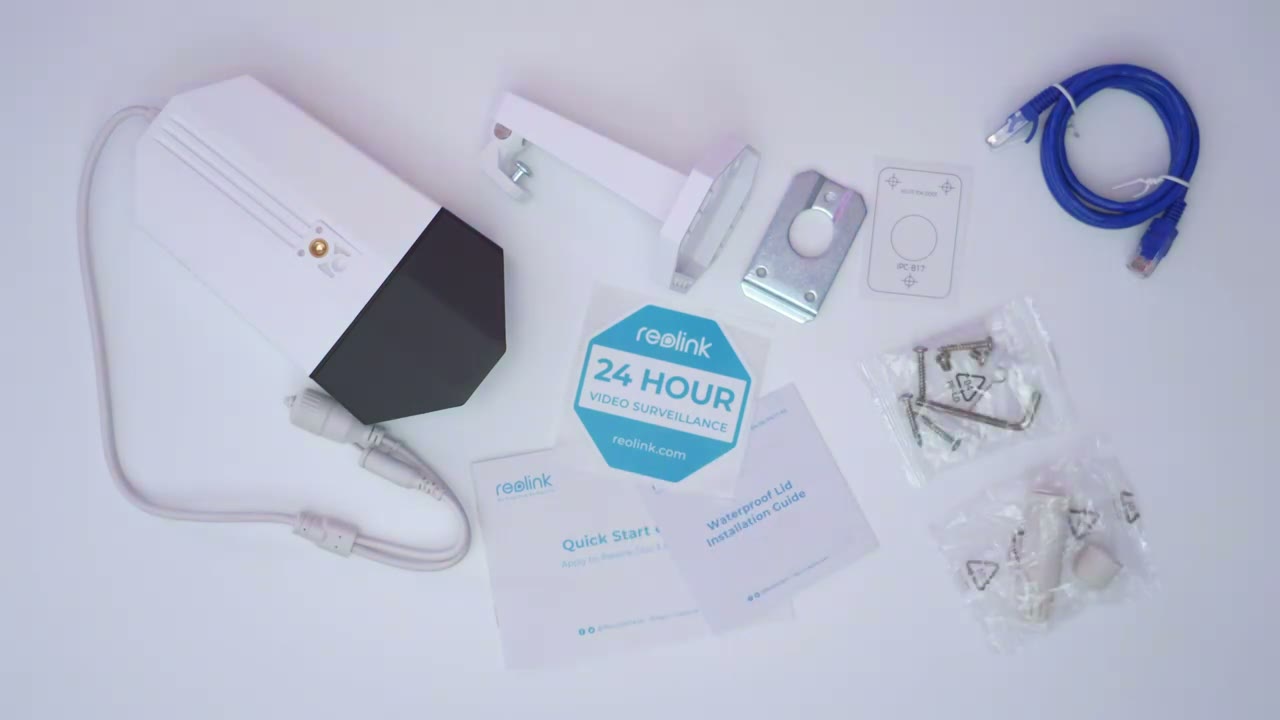
box we have the real link du3 camera we have the mount a mounting plate for we also have a quick start guide security sticker and a mounting guide along with an ethernet cable and mounting hardware
Design
the design of the real link Duo 3 looks very familiar to the rink Duo 2 which is a design that I really like so we have the Dual lens and then we also have some Spotlight LEDs here and this is what gives us that impressive 180° field of view now at at the very bottom we have a weather sealed area here and if we open that up we have access to the micro SD card slot which allows you to have up to 256 GB and then the reset and power button now we also have a threaded Mount at the very bottom and at the top because you can either have this you know ciling mounted or wall mounted and then we also have a speaker Grill here looking at the very back of the camera so we have pre-and wiring and we have a protective weather cover here for the power adapter and then we also have a protective covering for the ethernet pork or the RJ 45 Port the r link 203 comes in at roughly 530 G or 1 1/2 lb
Specs
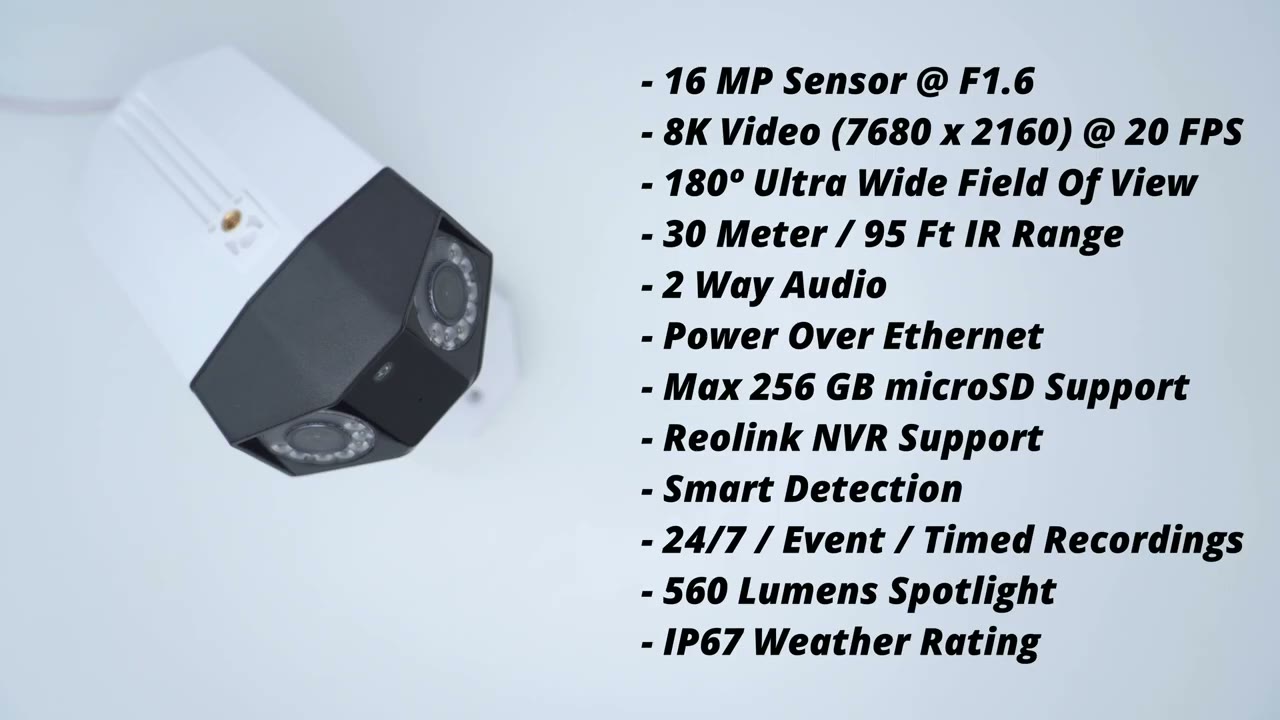
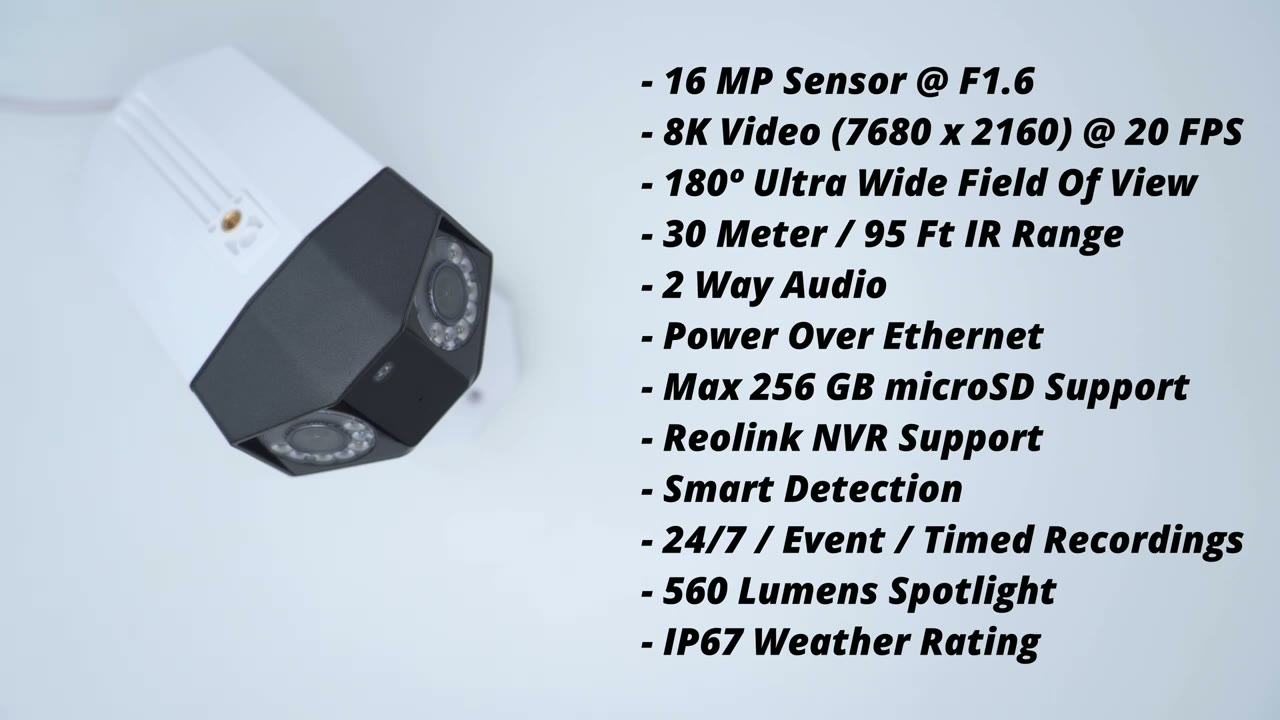
there’s an impressive 16 megap sensor capable of 8K resolution we have 180° field of view using an f1.6 lens with a 30 m infrared range there’s 2-way audio power over ethernet up to 256 GB micro SD card support and it is also compatible with the real link NVR there’s smart detection the camera can record 24/7 by motion or scheduled recordings the spotlight is is 560 lumens and it has an IP67 rating I’m
App Setup
going to go ahead and add the Dual 3 to the real link app so I’ll click the plus sign here go ahead and scan the QR code located at the back of the camera body and I’m just going to wait for everything to set up so that was fairly quick and what I’m just going to do is use my existing password that I use for my du2 the setup was super quick so I’ll just start live view to confirm everything is good and I’ll just run my hand in front of the camera lens there to install
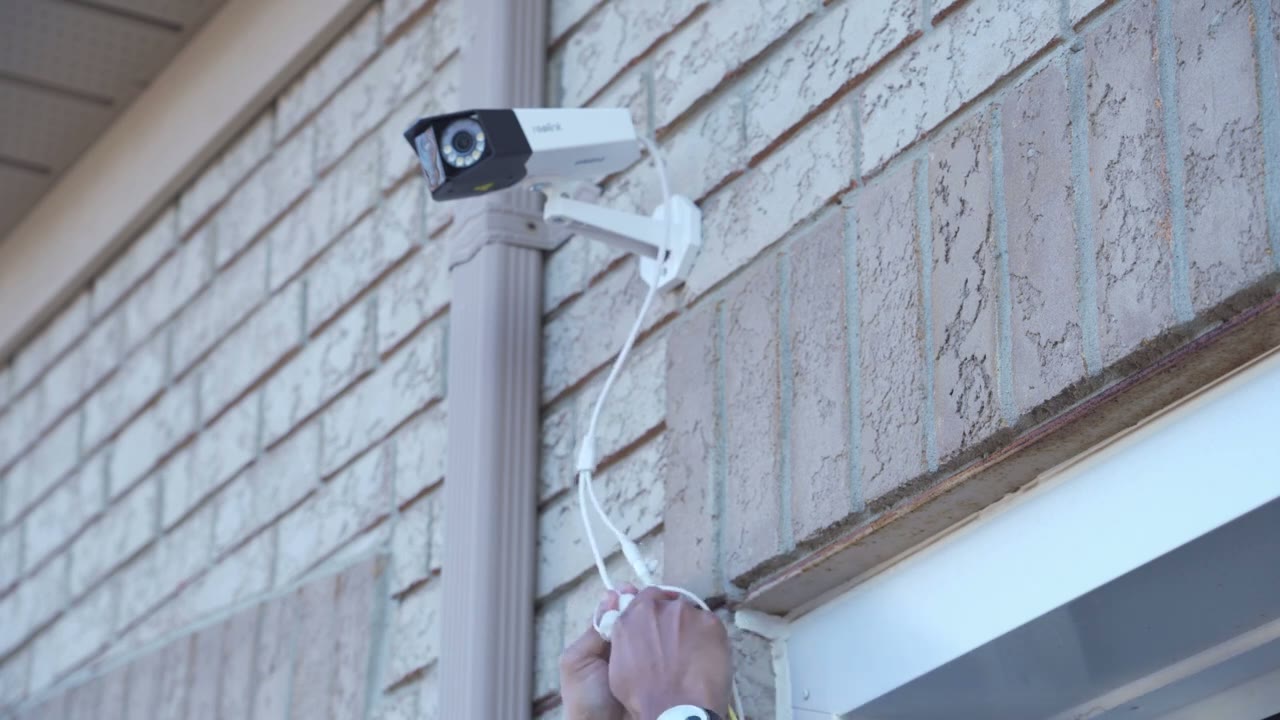
Installation
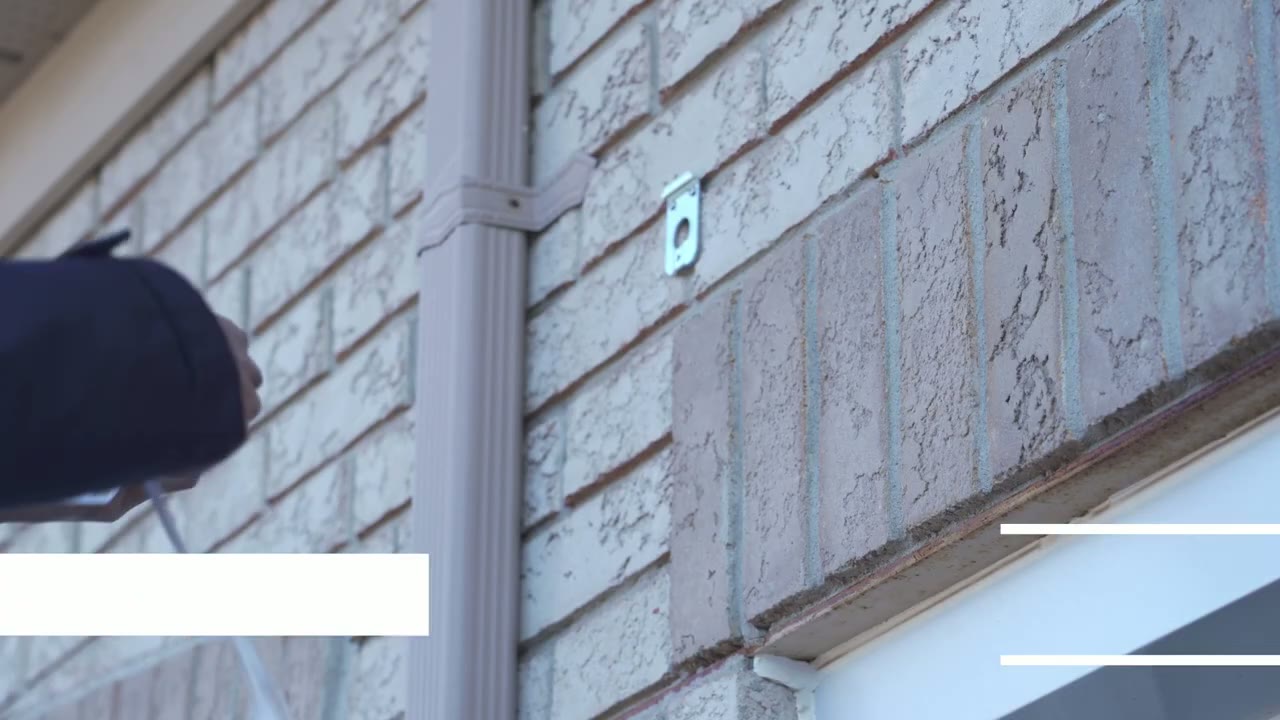
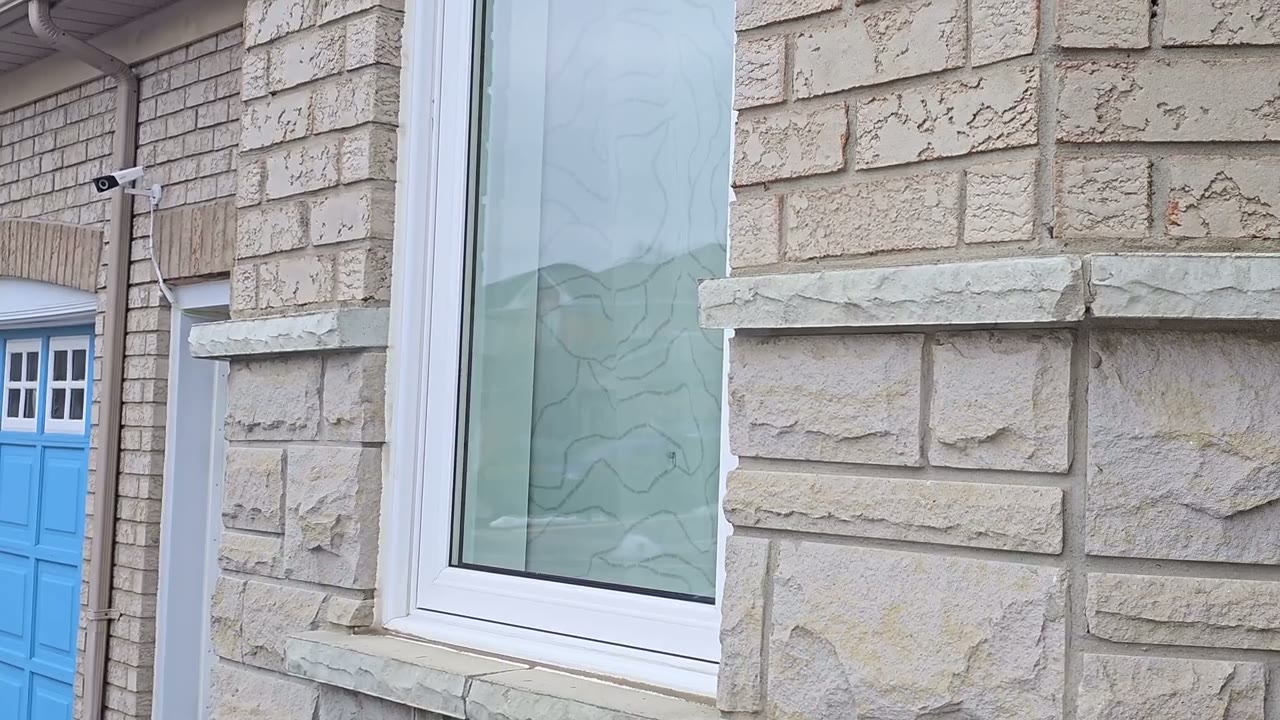
secure to rear mounting bracket to your wall or ceiling then insert the extension arm and finally secure it with the last remaining screw then connect the RJ45 or ethernet cable and use the weather sealed supplied accessories and
App Settings
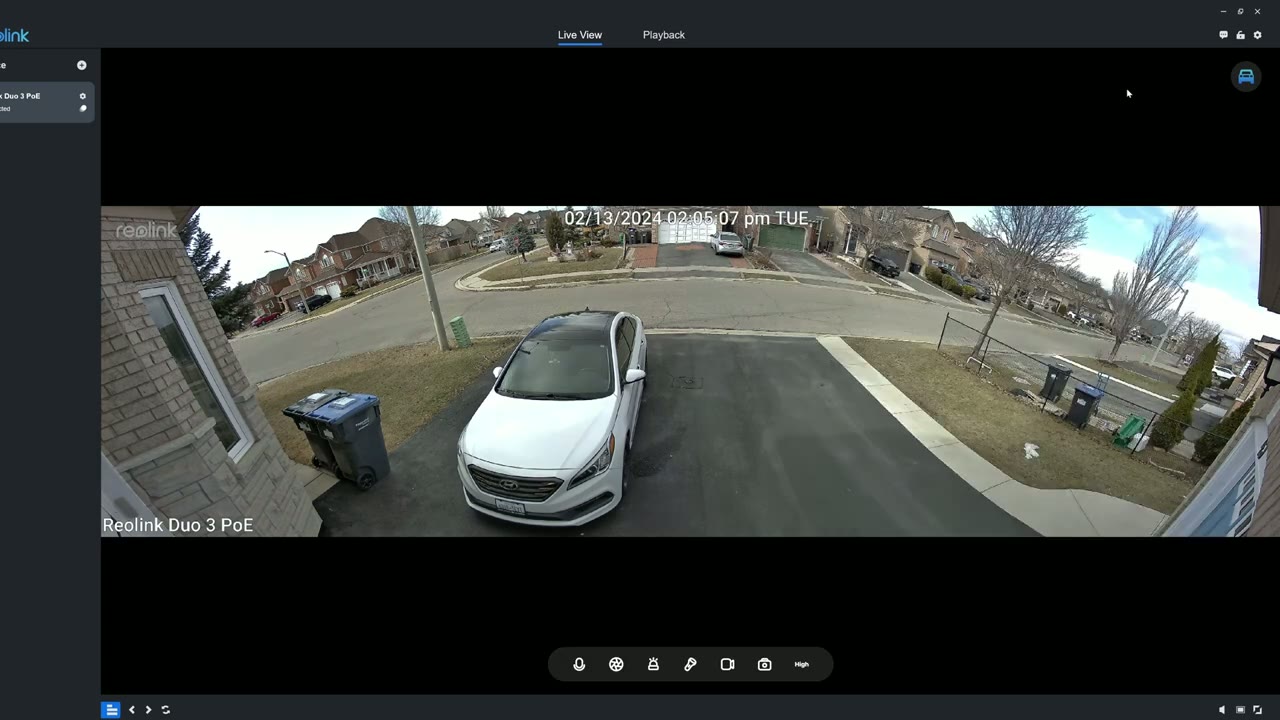
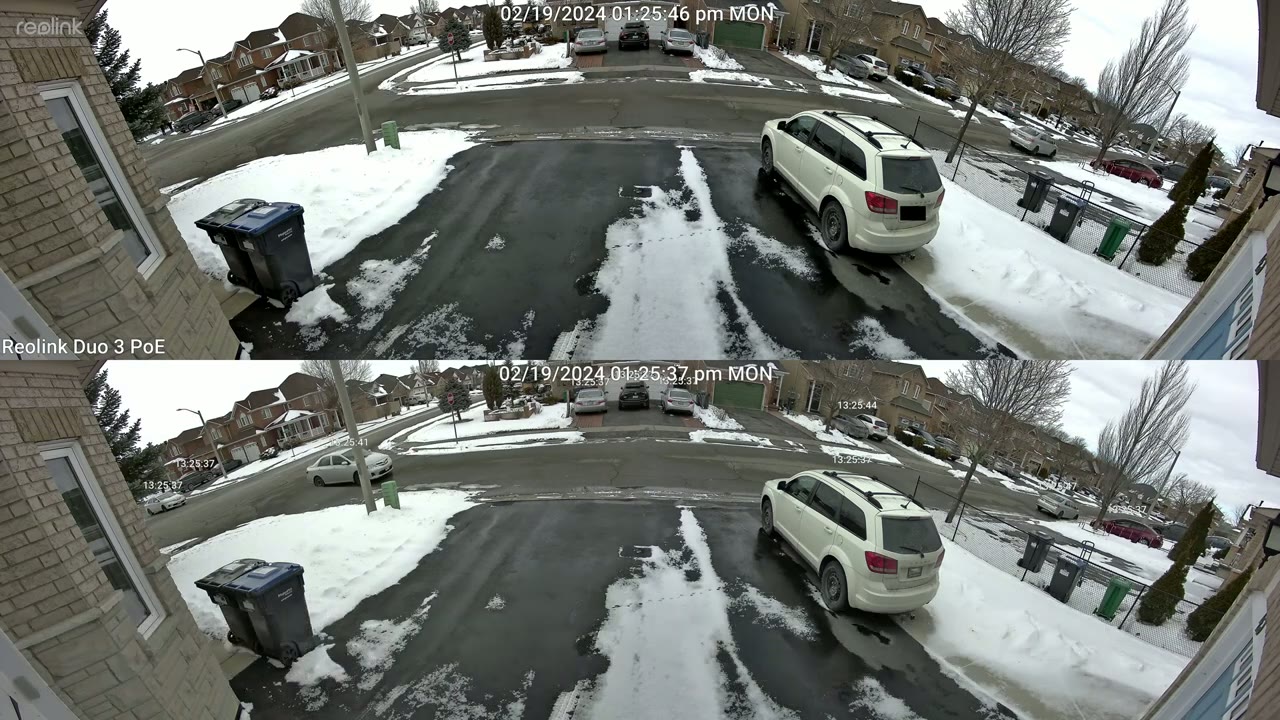
you’re done let’s take a look at the Dual 3 settings so of course you can do all of this on a cell phone I’m just choosing to do it on a computer since real link does give us software and one of the reasons why I love you know these real link cameras we have both options phone or software now I’m currently on live you can see at the top here and of course I can switch to playback now right from live view I can set the stream quality to be clear balanced or fluent and you would only set it to fluent if you don’t have a strong internet connection you could see the you know quality is much less including the bit rate so I’ll switch it back to clear and then we’re going to have the best possible quality and you can see if I zoom in I could easily make out my license plate you know the right on the recycle bin I can even see my dash cam in here and you know this kind of like uh hanging uh decoration that I have in the car so yeah the qual is really good if I try to go over to the neighbor’s yard I can’t make out their license plates um from here and that’s because that’s about you know maybe 70 to 80 ft away but anything within this range you know it’s easy to make out now it’s a very windy day today you can see the uh trees going here so you know you may notice a little bit of shaking and we also have you know kind of detect ction boxes here which is an optional feature and I’ll show how you can turn that off later but from the live view menu I can go ahead and initiate you know two-way talk with whoever is outside I can also go ahead and you know start a time lapse which I’ll demo later and then I can trigger the alarm manually if I saw something you know uh suspicious I could turn on the spotlight I can also start taking a manual recording if I didn’t have this set to 24/7 recording and I can also take a snapshot and again you know go ahead and change that uh stream uh speed or you know bit rate but let’s go into the full settings now and the first thing we can take a look at is display and this is for the onscreen display so you can see the camera name bottom left and you have the option to completely hide it or you know move the position around same for the date and time that I have in the middle here and you could just choose to completely turn off all watermarks and then for day and night for the image settings I just have it set the auto the camera will intelligently decide we know when to switch between black and white and color and if we go into advance we can change things like the brightness you can see it’s set to 135 if I crank it you see in real time that that’s addressed I’ll just bring it back to about what it was and then you can do the same for contrast saturation sharpness now we can also go into image stitching and I’ve kind of played with this a little bit so you could see um the edge of my driveway here this is pretty much a straight line however if I look at the neighbors area here you know it’s a bit distorted now I can probably play around with that a little bit more um for example you could see if I drop this here and you take a look at the garage here this garage has dropped down so it’s a little bit more normal but now you know my driveway is a little bit off so I think if I go ahead and play with that plus the distance I could probably fine-tune it perfectly but I’m most focused on what’s going on here so which is why I have it just um set up right here now the next thing that I can do is I can go into stream and set the parameters for that so for Clear it’s set to the highest resolution and then the the frames per second is 20 and that’s the maximum bit rate and if frame interval and I could go ahead and you know dro the frames per second down if I want to you know say save on storage same with the bit rate and you can also do the same thing for the low setting now I’ve also set the frame rate mode to be constant instead of Auto and same for the bit rate if I go into motion detection so motion Mark so this is a beta feature and you can see if I turn it off that’s what’s going to you know toggle those blue squares on and off so I’ll leave it off for now and then I can also go into motion sensitivity and you can see you can actually set the you know the sensitivity how high and the time period that you want it to be high so you could say that you know um at night when you’re sleeping that’s when you wanted the highest but when you’re at home and you’re expecting deliveries or you know people coming and going maybe you don’t want it that way so you know you have some flexibility there and then we can go into smart detection a lot of fine tuning here so I can go ahead and set you know the sensitivity in theend ently for you know persons um you know say vehicles and animals underlight again you know I’ve set it to Auto instead of you know stay off the camera is just going to intelligently decide and then for a spotlight you can set the brightness which I’ve set it to the maximum and also again you could set it you know come on during a specific time I’ve set it for right now in the winter um to come on at night and to stop in the morning but you know you can just set it to just stay off all the time or set it to you know night mode where it’ll come come on when it sees someone or it detects something now if we go into audio of course I’m going to want audio um recorded with my video and then you could adjust the speaker volume as well and then enable you know how much noise reduction you want or if you want to turn that off and we have the option to overwrite the oldest files which I’ve done and we can have pre-record motion and you could set how much you want now this is not that important if you have it set to continuous this is more for Ev event based recording let’s go the schedule and you can see every blue square is where this is active so because I’ve set everything to be active and I’ve ticked off all notifications this is what’s going to give me you know the 247 recording under this timer feature here so you know if you want 24/7 recording just remember to enable that and then you have options for you know getting email alerts um FTP uh siren so you can set it so you know it’s going to go off whenever motion’s detected and of course you can set a schedule so you can say you know maybe just at night want the siren to go off and if it’s only a person not you know a vehicle and then we can also go into push notifications and then you could set you know how often you want that to occur from 20 seconds to 2 minutes and of course you can set a schedule and the type of detections as well um this takes up to a 256 GB micro SD card I’ve inserted a 128 I’m fully utilizing it but it’s going to overwrite the oldest files as I’ve shown and then if we go into system this is where we can just go ahead and add additional users to review video
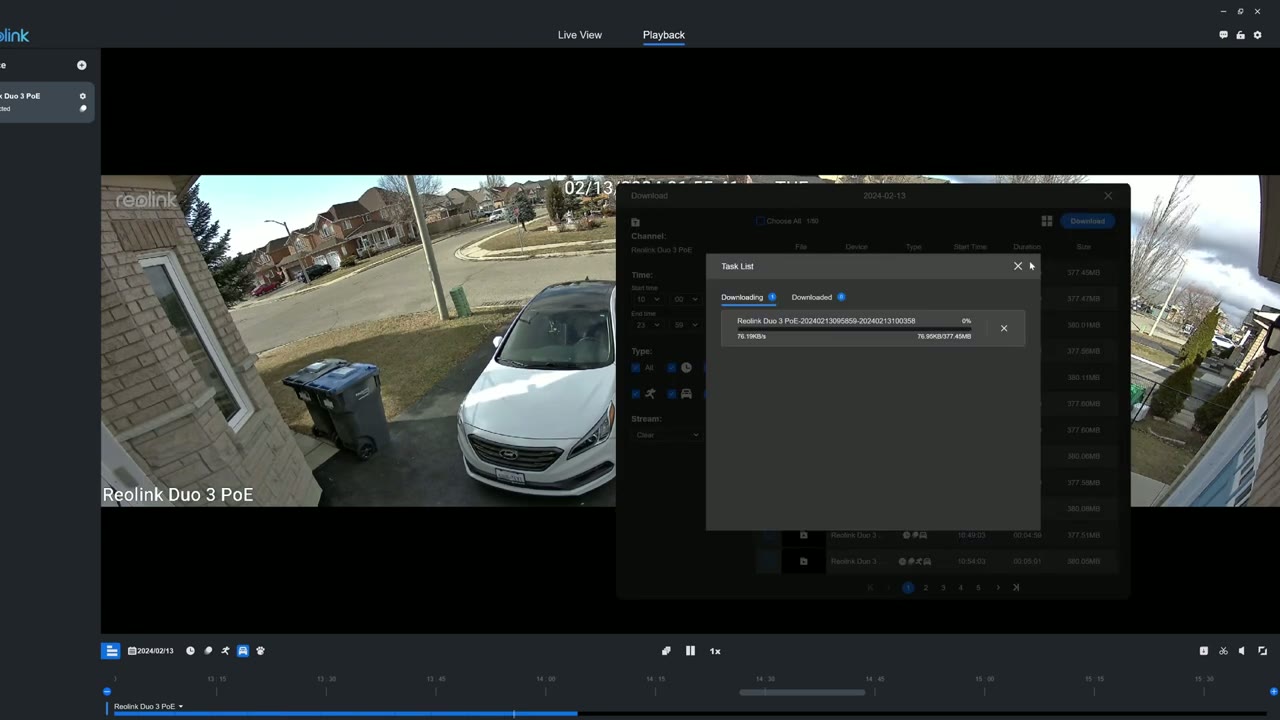
Video Playback
playback we’ll go to the playback Tab and you know you could pick a date and the type of motion that you want so I could say that hey I only want to see you know human motion or vehicles for example and I’ll just go to the end of the timeline here and I’ll just go ahead and click on here and I’ll just wait for that to load and you can see you know a vehicle just went by there so it probably picked that up and then of course you could go ahead change the playback speed and once you see something interesting you just hit the download button and it populates you know all these type of video fils you could see the start time and the duration and you know you could manually just you know punch into a specific time on here and just take a look at video files hit that and then just hit download and it does its thing so very simple to
Video Quality
navigate all right let’s talk video quality and this thing does phenomenally during the day and at at night and of course because we’re now working with a 16 megap sensor versus you know the 8 megapix on the du2 the quality is even better than on the du2 which already was really fantastic storing 8K footage
Storage
obviously takes a lot of space now with the DU 3 we can insert up to a 256 GB micro SD card and I’m estimating I’m going to get between 3 maybe 3 and 1/ half to 4 days of video playback history that’s based of course on it recording at the highest resolution at a constant bit rate constant frames per second and at 20 frames per second which is the max on this system and that’s not enough for me because I like to have a camera system where I can get at least one week of video playback history you know 7 to 10 days has even better for me because if I go on vacation for a week when I come back I could review that whole week if something was up now the work around for that obviously is to just get real links and VR unit and then those come with a variety of different capacities for the hard drive then you can easily get you know weeks or months of video playback history so something to be mindful of but I do wish that we had the ability in search you know a 512 GB micro SD card then we can get you know around 7 to 8 Days the spotlight on the
Spotlight
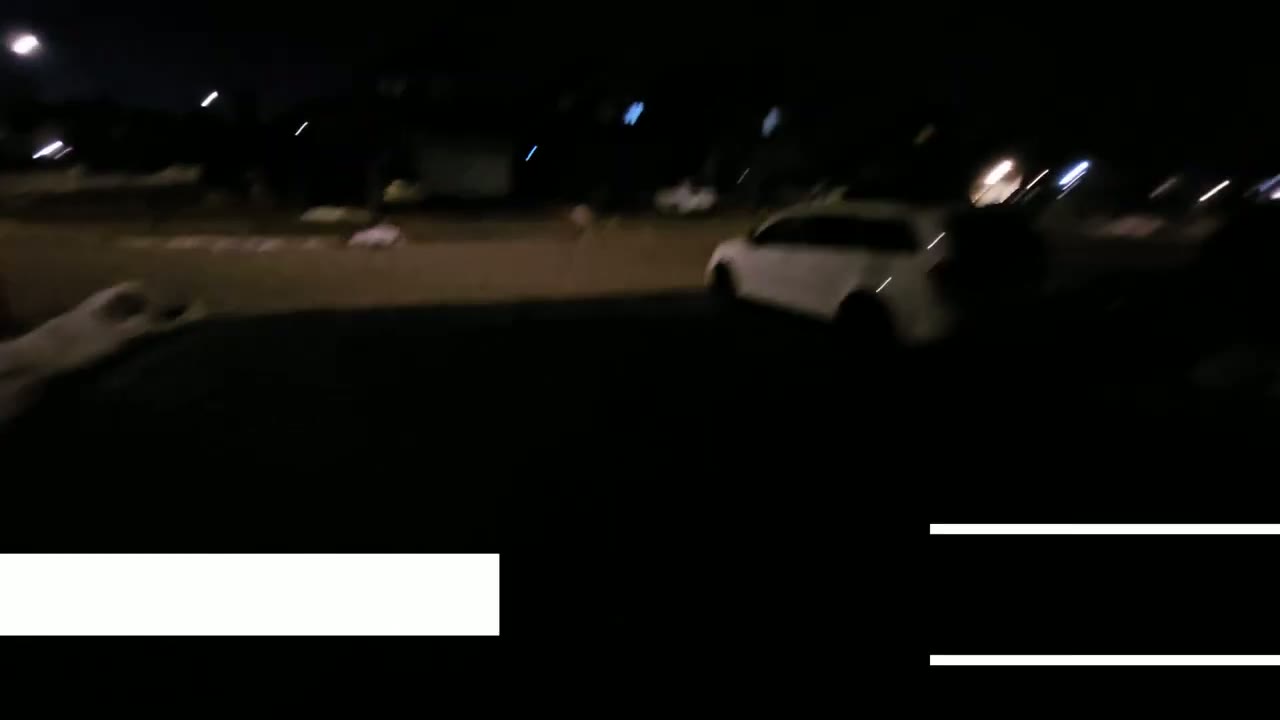
DU 3 Max is out at 560 Lums because it is such a small and compact camera body but it’s still enough to fully illuminate you know my car on my driveway and it can actually reach to the end of my driveway I’ll just lose a little bit of light output as it gets further out of course but like I showed at night vision video it’s still plenty enough to have decent color night vision the Dual 3 has an exciting new feature
Motion Track (NEW)
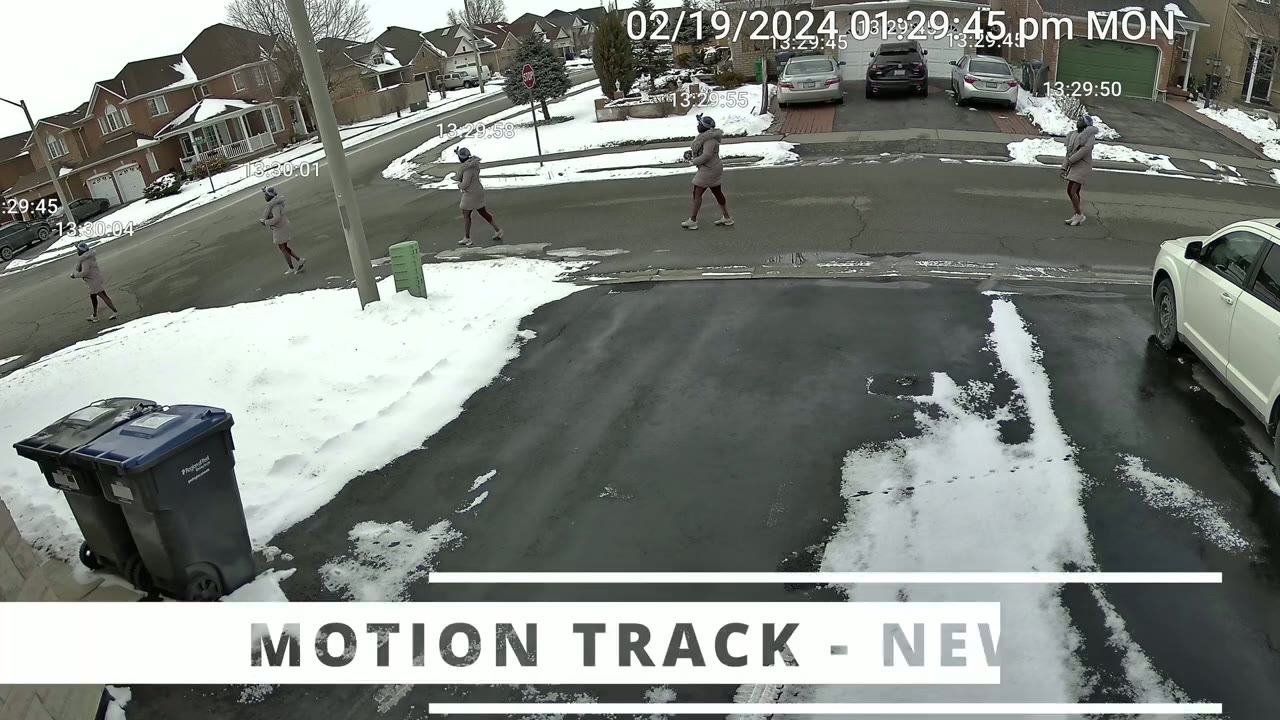
called motion track so if you go under email alerts just go ahead and set it up so you can get email alerts set it to text with picture and then go into image setting and you can see I’ve enabled motion track and motion time stamp and what this does is it’s going to actually email me an image and on the image I’m going to see the subject whether it’s a person or a car and I’m going to see their entire trajectory or path of movement without actually looking at a video here’s an example of more of the motion track images and the accompanying recorded video so you can see just how accurate and useful this feature is the
Motion Detection
motion detection speed and app alert or notification speed is lightning quick on here as you would expect because it is a 180° field of view and that’s just another one of the benefits because you know you have a full coverage uh basically you put this at the side of your house in front of your house your backyard there’s no real blind spots at all so as soon as there’s any type of movement you know a car a person an animal you will be notified right away it’s not like the camera has to pan to where the motion is occurring to detect it it can just see it all the time and because the motion detection is so quick the alarm also kicks in very quickly as well and here’s a demo of
Speaker
that here’s an example of what 2-way talk sounds like you can hear that is very clear and very loud so considering
Recommended?
all of that I can easily recommend the realink duo3 poe security camera I really love the duo2 and the DU do3 just you know enhances or improves on that whenever someone or something enters the frame they stay or loer around or they leave you always know their full trajectory with other camera systems because the field of view is limited you know you are going to miss some of that action maybe you won’t see when they enter the frame or maybe you’ll miss it when they left the frame because they were moving too fast with this you’re not going to miss anything and you do have 24/7 recording another huge benefit is that there’s no monthly fees unlike some camera brands which have recently increased their monthly fees so if you’re interested in picking up the realink duo3 poe security camera I’m going to leave some links down below and if you’re still debating between you know the duo 2 or the duo 3 I’ll leave a link to my review of the Dual 2 Wi-Fi model and of course if you found this video helpful please consider liking and subscribing it truly does help me out a lot and I’ll see you in the next one soon
Buy Reolink Duo 3 POE Camera on Reolink
Buy Reolink Duo 3 PoE Camera on
Buy Reolink Duo 3 PoE Camera on Amazon Worldwide
Buy Reolink Duo 2 POE Camera on Amazon
Buy Reolink Duo 2 Wifi Camera on Amazon
Please note that some of the links in my video descriptions are affiliate links where I earn from qualifying purchases. As an Amazon Associate I earn from qualifying purchases.